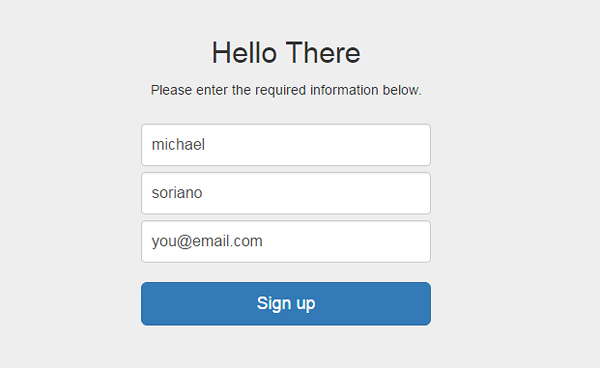
So let’s continue with our registration system. We left off at the point where we have the registration page setup. So let’s try it out and fill in some information. Add your name and an email address. The fields should have validation, so you should see an error if you missed a field, or the email is invalid. We also check if the email is duplicate – so you should see an error for that as well.
Update 9/5/2016: Updated flaw in token creation and token checking for better security. Thanks to comment by Mohammad and his findings.
Update 7/20/2016: Added index.php file to the views directory. This is the view that is being used once a successful login is processed.
Once you fill out the fields, check your database for the new entries. The user table should look like below:
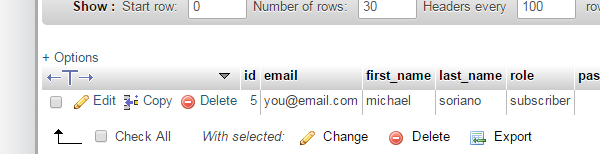
Note that we have the status set to “pending” as well as the role set to “subscriber”. We also have the password blank at the moment. Open the “tokens” table and you should see a new entry as well:
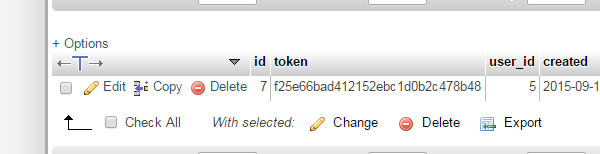
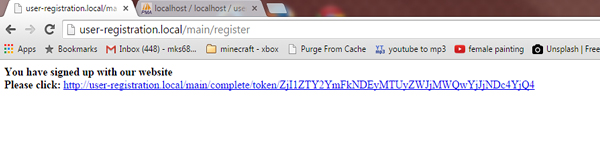
Notice our user ids match in both tables. You should also be seeing our message in the browser – which is the message we will be sending through email to our user:
Now we’re ready to code the 2nd part of the registration process.
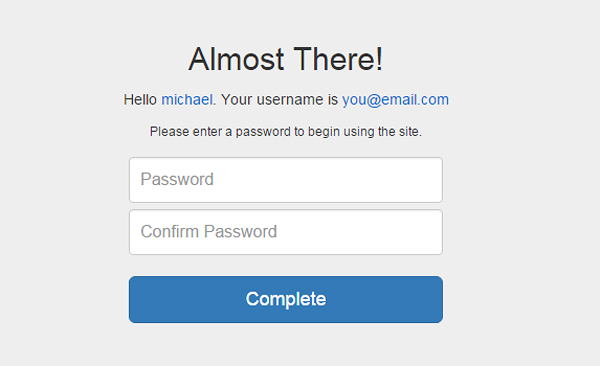
The “Complete” your registration page
So our user gets an email to complete the registration. This email has a link with a “token” that ties the user id and the time created. So the code below is for our “complete” action. imply add to our Main controller:
public function complete()
        {
            $token = base64_decode($this->uri->segment(4));
            $cleanToken = $this->security->xss_clean($token);
            $user_info = $this->user_model->isTokenValid($cleanToken); //either false or array();
            if(!$user_info){
                $this->session->set_flashdata('flash_message', 'Token is invalid or expired');
                redirect(site_url().'main/login');
            }
            $data = array(
                'firstName'=> $user_info->first_name,
                'email'=>$user_info->email,
                'user_id'=>$user_info->id,
                'token'=>$this->base64url_encode($token)
            );
            $this->form_validation->set_rules('password', 'Password', 'required|min_length[5]');
            $this->form_validation->set_rules('passconf', 'Password Confirmation', 'required|matches[password]');
            if ($this->form_validation->run() == FALSE) {
                $this->load->view('header');
                $this->load->view('complete', $data);
                $this->load->view('footer');
            }else{
                $this->load->library('password');
                $post = $this->input->post(NULL, TRUE);
                $cleanPost = $this->security->xss_clean($post);
                $hashed = $this->password->create_hash($cleanPost['password']);
                $cleanPost['password'] = $hashed;
                unset($cleanPost['passconf']);
                $userInfo = $this->user_model->updateUserInfo($cleanPost);
                if(!$userInfo){
                    $this->session->set_flashdata('flash_message', 'There was a problem updating your record');
                    redirect(site_url().'main/login');
                }
                unset($userInfo->password);
                foreach($userInfo as $key=>$val){
                    $this->session->set_userdata($key, $val);
                }
                redirect(site_url().'main/');
            }
        }
First order of business is to validate the token. We grab it from the url with CI’s uri helper: “segment(4)”. The code below “isTokenValid()” resides in our model, which checks the validity of the token and returns the user information on success and false on no.
Note that I’m only using a weak time check – which compares to strings to be equal. You should implement your own mechanism which does a dateDiff or something like that.
public function isTokenValid($token)
    {
       $tkn = substr($token,0,30);
       $uid = substr($token,30);
        $q = $this->db->get_where('tokens', array(
            'tokens.token' => $tkn,
            'tokens.user_id' => $uid), 1);
        if($this->db->affected_rows() > 0){
            $row = $q->row();
            $created = $row->created;
            $createdTS = strtotime($created);
            $today = date('Y-m-d');
            $todayTS = strtotime($today);
            if($createdTS != $todayTS){
                return false;
            }
            $user_info = $this->getUserInfo($row->user_id);
            return $user_info;
        }else{
            return false;
        }
    }
Going back to our action, we simply create the “$data” array which we’ll need in our form. We’re also loading a “Password” class – which does the heavy lifting for our passwords. The class creates a dynamic salt appended to the password. The default hash is “sha256” and is fully configurable.
So token is good, validation passes – we then move on to updating our user information: “updateUserInfo()”. This goes in our model:
public function updateUserInfo($post)
    {
        $data = array(
               'password' => $post['password'],
               'last_login' => date('Y-m-d h:i:s A'),
               'status' => $this->status[1]
            );
        $this->db->where('id', $post['user_id']);
        $this->db->update('users', $data);
        $success = $this->db->affected_rows();
        if(!$success){
            error_log('Unable to updateUserInfo('.$post['user_id'].')');
            return false;
        }
        $user_info = $this->getUserInfo($post['user_id']);
        return $user_info;
    }
The above simply updates our table with the new password, login time and the status to “active”. We have enough to complete our registration process.
Our view called “complete” will contain our HTML:
<div class="col-lg-4 col-lg-offset-4">
<h2>Almost There!</h2>
<h5>Hello <?php echo $firstName; ?>. Your username is <?php echo $email;?></h5>
<small>Please enter a password to begin using the site.</small> <?php
$fattr = array('class' => 'form-signin');
echo form_open(site_url().'main/complete/token/'.$token, $fattr); ?>
<div class="form-group"> </div>
<div class="form-group"> </div>
<?php echo form_submit(array('value'=>'Complete', 'class'=>'btn btn-lg btn-primary btn-block')); ?>
<?php echo form_close(); ?></div>Note that I’m using Bootstrap, so our form automatically looks nice. I’m also using CI’s form helper which makes our form building faster
Our form should look like below:
On success you will notice that we set the session with the user data that we’ve fetched from the back end “set_userdata()“. We’re also redirecting them to the homepage of our site. On failure, we user CI’s “set_flashdata()” to set an error message temporarily in session, and displaying it above our form.
The Login Form
With what we’ve done above – it’s now possible to create a login form. See, we’re using an encryption technology that only our application can process. So it is important that we create our registration system first, before we can create a login form.
This way – we can test it properly.
The code below is our controller logic for our login form:
public function login()
        {
            $this->form_validation->set_rules('email', 'Email', 'required|valid_email');
            $this->form_validation->set_rules('password', 'Password', 'required');
            if($this->form_validation->run() == FALSE) {
                $this->load->view('header');
                $this->load->view('login');
                $this->load->view('footer');
            }else{
                $post = $this->input->post();
                $clean = $this->security->xss_clean($post);
                $userInfo = $this->user_model->checkLogin($clean);
                if(!$userInfo){
                    $this->session->set_flashdata('flash_message', 'The login was unsucessful');
                    redirect(site_url().'main/login');
                }
                foreach($userInfo as $key=>$val){
                    $this->session->set_userdata($key, $val);
                }
                redirect(site_url().'main/');
            }
        }
Nothing new in the code above. Again, we’re setting validation rules for our 2 fields. We grab the post array and clean it via xss_clean(). Then we get to our model which has the checkLogin() method below:
public function checkLogin($post)
    {
        $this->load->library('password');
        $this->db->select('*');
        $this->db->where('email', $post['email']);
        $query = $this->db->get('users');
        $userInfo = $query->row();
        if(!$this->password->validate_password($post['password'], $userInfo->password)){
            error_log('Unsuccessful login attempt('.$post['email'].')');
            return false;
        }
        $this->updateLoginTime($userInfo->id);
        unset($userInfo->password);
        return $userInfo;
    }
    public function updateLoginTime($id)
    {
        $this->db->where('id', $id);
        $this->db->update('users', array('last_login' => date('Y-m-d h:i:s A')));
        return;
    }
The above selects all columns where the user id and password match. Note that we’re using the validate_password() method from our Password class. We then update the login time and return the user information back to our controller.
Our login form view contains the code below:
<div class="col-lg-4 col-lg-offset-4">
<h2>Please login</h2>
<?php $fattr = array('class' => 'form-signin');
echo form_open(site_url().'main/login/', $fattr); ?>
<div class="form-group"> </div>
<div class="form-group"> </div>
<?php echo form_submit(array('value'=>'Let me in!', 'class'=>'btn btn-lg btn-primary btn-block')); ?>
<?php echo form_close(); ?>
<p>Don't have an account? Click to <a href="<?php echo site_url();?>main/register">Register</a></p>
<p>Click <a href="<?php echo site_url();?>main/forgot">here</a> if you forgot your password.</p>
</div>Again, using CI’s form helper along with Bootstrap classes to make our form nice. We also have a link back to the “Register” page, which we covered in the first part of this tutorial. Finally, we have another link to the “Forgot” password link – which I’ll cover in Part 3.
Stay tuned.
i an getting this error
Call to undefined function mcrypt_create_iv()
i am using php 7.2.4 and mcrypt_create_iv()was DEPRECATED in PHP 7.1.0, and REMOVED in PHP 7.2.0
so kindly update password library.
The file has been updated https://github.com/michaelsoriano/user-registration-codeigniter/commit/0abf42d09e0cfd3cea849b4dd7d0a024d2011274
@Michael Soriano Indeed a great article to learn from! Below are my queries,it’d be great if u would give more clarity on those.
1) I wanted to know when will the role be set to admin and when will it be subscriber. In my case it is being set to subscriber all the time. Although I want it to be admin for some users.
2) The status is set to pending unless the user hits the unique generated link. Under which scenario will this condition be executed? https://github.com/michaelsoriano/user-registration-codeigniter/blob/0abf42d09e0cfd3cea849b4dd7d0a024d2011274/application/controllers/Main.php#L178
1) Yes – it will only set to subscriber. That’s all it does. The role administrator is there for other purposes, which was not included in the tutorial.
2) This is inside the “forgot()” method which is when a user is trying to reset their password. This is simply a check if the user hasn’t gone through a successful “complete()” method (where the status is set in the model-> updateUserInfo().