Form validation is a task that you can’t get away with when building forms.
In React, I feel that forms is not its strongest selling point. Although validation is pretty straightforward. Keep in mind that this is a simple technique – where it does the validation on “Submit”, while the error messages are shown in-line (underneath the field that has an error).
We’re also using Boostrap – so the styling of the fields that has an error is already done.
Note that I also have another form validation tutorial using VueJS.
Ready to start? Here’s a sample of what we’ll be building. Start typing in values in the form to the right, and click “Submit”.
As you can see, it validates on “Submit”, not on field change. If you want to learn how to do “instant” validation with React (as you type), see this article.
Let’s start with the boilerplate class with a constructor:
class App extends React.Component {
   constructor(props) {
    super(props);
    this.state = {
      firstname: "",
      email: "",
      errors: []
    };
  }
}
And as you can see, we initialize our state. A property / empty value pair for each of our fields. You see our “errors” array is empty. This is where we’ll stuff our – you guessed it, fields with errors.
Let’s create our markup in the render function of our class:
render() {
return (
<form>
<input
className={
this.hasError("firstname")
? "form-control is-invalid"
: "form-control"
}
name="firstname"
value={this.state.firstname}
onChange={this.handleInputChange}
/>
<div
className={
this.hasError("firstname") ? "inline-errormsg" : "hidden"
}
>
Please enter a value
</div>
<button className="btn btn-success" onClick={this.handleSubmit}>
Submit
</button>
</form>
);
}
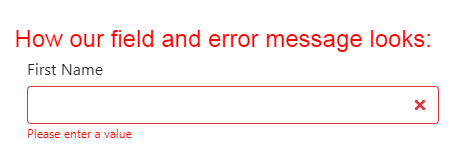
}I’ve only added 1 input and the submit button for illustration purposes. One key thing to note here is the use of this.hasError() in our markup. For instance, in the input field itself, we’re switching the classes so if there’s a bad value – the field will look like below:
Now, let’s build that hasError method – which is simple:
hasError(key) {
    return this.state.errors.indexOf(key) !== -1;
  }
As you can see, all we’re checking is if the “key” is in the array “errors” that we have in state.
Now let’s move on to the “handleInputChange”. This happens every time we change values in our fields:
 handleInputChange(event) {
    var key = event.target.name;
    var value = event.target.value;
    var obj = {};
    obj[key] = value;
    this.setState(obj);
  }
Note that the function above doesn’t have our validation code. All it does is update our state. Remember, controlled components in React has a unidirectional pattern for the data. Which means that the source of truth is always the state. And this data is immutable until we change it using “setState”. And that’s all we’re doing in handleInputChange().
Let’s create our function when clicking the Submit button:
handleSubmit(event) {
    event.preventDefault();
    let errors = [];
    //firstname
    if (this.state.firstname === "") {
      errors.push("firstname");
    }
    //email
    const expression = /\S+@\S+/;
    let validEmail = expression.test(String(this.state.email).toLowerCase());
    if (!validEmail) {
      errors.push("email");
    }
    this.setState({
      errors: errors
    });
    if (errors.length > 0) {
      return false;
    } else {
      alert("everything good. submit form!");
    }
  }
You see how we start with event.preventDefault(). This is so that the default button behavior is not executed. We simply want to stay on the page and not refresh the page. We then create a local “errors” array (which is always empty upon clicking Submit). This is the array we stuff our errors into when the values of our fields are invalid.
Finally, we stuff that array into our state using setState().
One more thing, let’s bind both functions. We add this to our constructor:
this.handleInputChange = this.handleInputChange.bind(this);
this.handleSubmit = this.handleSubmit.bind(this);
Doing the above will allow us to have access to the “this” keyword in our functions.
And that’s about it. We’ve just validated our fields in React. That wasn’t so bad I suppose. Feel free to check it out in CodeSandbox and leave me comments below.
Hey i’m currently building a website using this approach just wondering how i send the emails to the relative endpoint
How do I add this to radio boxes?