In my last post, we’ve added the comments area to our single post page. This included the comments list, along with the comments form. Remember we’re still working with the framework Next.js and WordPress REST API.
But what good is a form if all we get is junk? What is stopping bots from spamming our comments? This is where reCaptcha comes in. Let’s go ahead and add that to our form.

We’re going to use reCaptcha v2 – the traditional “I’m not a Robot” checkbox. I’ve used version 3, and the invisible one, but for some reason I like the older style better.
Go and add the script tag in your head section of your template.
<script src="https://www.google.com/recaptcha/api.js" async defer></script>Let’s add the field into our form. So open up CommentForm.js and add as part of the fields:
<div className="g-recaptcha" data-sitekey="YOURSITEKEY"></div>The site key can be hard coded in the form if you like. It is client side and is visible in the source code. Don’t worry about hiding this value.
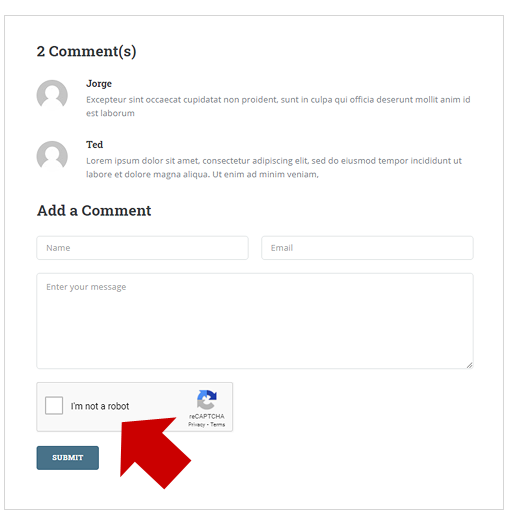
If the site key and the script tag is good, it should render like below:

Once this is done, we’re ready to continue to the steps below.
Create an API Route
So this part is necessary to serve as a proxy for our post request. See, we can’t go directly to the WordPress Comments API any longer like we did in the previous tutorial. We need a way to call Google’s api first, then go to WordPress. And we need this using Server side code.
Enter API Routes with Next.js. They’re still basically pages, but built mainly for JSON responses as an output. You can learn more about it here.
Let’s create an api folder under pages, then create a new file called “comments.js“. This serves as the endpoint we call when we submit our form.
In comments.js, let’s add the code below:
import Axios from 'axios';
export  default async (req, res) => {
    let googleUrl = 'https://www.google.com/recaptcha/api/siteverify?secret='+process.env.CAPTCHA_SECRET+'&response='+req.body.captcha;
    let captchaResponse = await Axios({
        url : googleUrl
    });
    if(captchaResponse.data.success === false){
      res.statusCode = 500;
      res.setHeader('Content-Type', 'application/json');
      res.end(JSON.stringify({ success : false, message : 'captcha failed' }));
    }else{
      //captcha passes, continue to wp api...
      let response = await Axios({
              method : 'post',
              url : process.env.BACKEND + `comments`,
              data : req.body
          }
      );
      if(response.status === 201){
        res.statusCode = 200;
        res.setHeader('Content-Type', 'application/json')
        res.end(JSON.stringify({ success: true, message : 'record created, awaiting approval' }))
      }
    }
}
If you look at the above code, we’re simply taking the values of the post (from our form), including the captcha response (we stuffed it inside req.body.captcha). Note that we’re using environment variables (process.env) to store secret keys and other stuff. See .env files in Next.js to learn more.
We call Google, and depending if it thinks you’re not a spammer, we go to WordPress API. Otherwise, we throw a 500 error.
Submit Form Handler
Back in CommentForm.js let’s modify our handleSubmit method to look like below:
const handleSubmit = useCallback( async (e) => {
        e.preventDefault();
        fields.captcha = grecaptcha.getResponse();
        let commentLocalApi = await Axios({
            method : 'post',
            url : '/api/comment',
            data : fields
        });
        if(commentLocalApi.status === 200){
            showSuccess = true;
            message = 'Your comment is waiting approval.';
        }
    }, [])
Notice that we’re adding a new property called “captcha” to our fields object, right before we do the call.
And instead of submitting to WordPress directly, we do it to our newly created /api/comment endpoint. Depending on the response, we show some kind of messaging etc.
Give this a try and let me know what you think in the comments below.
Happy coding.


Thanks for your useful blog post
But anyhow the wordpress comments api is open and can be attacked by a spammer bot
I think a better solution is that comment api be disabled and only can receive new comment through an authentication method like Basic