Learn how to code a simple Image Rotator without using a plugin
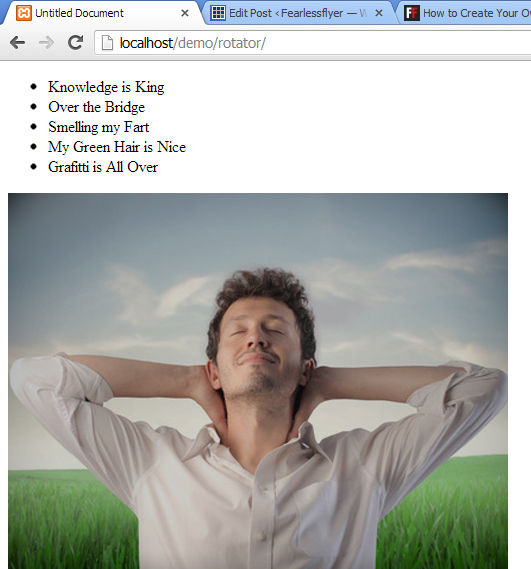
So it’s that time again to roll up our sleeves and do some old fashioned front end a’ coding. This tutorial is for an Image Rotator. What is it you ask? An Image Rotator is particularly useful for galleries, articles, or portfolios. You can use it just about anywhere you want to cycle through content. First, take a look at the demo to see what we’re building:
View Demo
But there’s hundreds of plugins out there that do this same thing? True – but there’s nothing like writing one for yourself. See, the problem with using a plugin – is that you’re quite limited to the options that they allow you to pass. By writing one for yourself – you know exactly what’s going on and you have total control of what goes on. Ready to get started?

The Markup
The challenge is: we want a clean markup as possible. This makes it easy for search engines to crawl through our content. Start with the code below:
-
- Smelling the air
-
- Some Crazy Colors
-
- Awesome Hairdo
-
- Color Cans Bruh
-
- Grafitti All Over


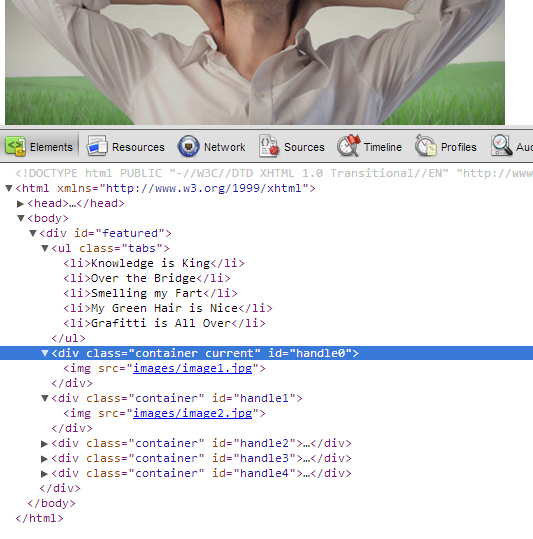
You see, all we have is a mother div. Inside is an unordered list followed by images with enclosed divs around them. This is enough to get our Rotator cooking.

Add Some Javascript
We’re going to use the jQuery Library for our Rotator because of it’s ease of use, and browser compatibility. Make sure in your HTML, you link to the library.
Then open up another script tag, and place the code below:
$(document).ready(function(){
 $('.container').each(function(e){
  if(e == 0){
   $(this).addClass('current');
  }
  $(this).attr('id', 'handle' + e);
})
This loops through all of our “container” divs and adds an “id” attribute to them. The Ids are called “handle” along with “e” – which is the index (a number for each of them). It also adds a class “current” to the first one it finds.

Next, add the code below inside the document ready clause.
$('.tabs li').each(function(e){
if(e == 0){
$(this).addClass('current');
}
$(this).wrapInner('');
$(this).append('![]() ');
$(this).children('a').attr('href', '#handle' + e);
y = $('#handle' + e + ' img').attr('src');
$(this).find('img').attr('src', y);
t = $(this).children('a').text();
$('#handle' + e).append('
');
$(this).children('a').attr('href', '#handle' + e);
y = $('#handle' + e + ' img').attr('src');
$(this).find('img').attr('src', y);
t = $(this).children('a').text();
$('#handle' + e).append('
‘ + t + ‘
‘); })
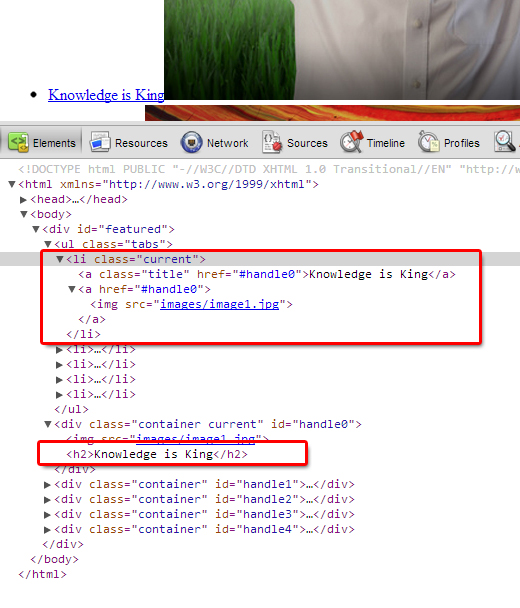
Line by line – the code above loops through each of our list items (li tags). It adds the class “current” to the first one it finds. Then wraps the text inside around an anchor tag with class “title”. It then appends another anchor tag with an image inside of them. It finds all of the anchor tags and adds attribute “href” – with a link to “#handle” plus “e” (Remember the ids we assigned to the containers a while ago?).
You see the variable “y” – it’s actually grabbing the large image’s src attribute and storing it in a temporary variable, then assigns it to the small image that we’ve dynamically created above. Finally, variable “t” is grabbing the list item’s text – and assigns it to an H2 tag for the large images. Take a look at your mark up now:

Some Events
We have our clean markup, we’ve dynamically altered it with Javascript and now we’re creating some events. We want the images to automatically rotate, as well as switch once the small images are clicked. Let’s do that first.
Add the lines of code below:
$('.tabs li a').click(function(){
	c = $(this).attr('href');
	if($(c).hasClass('current')){
		return false;
	}else{
		showImage($(c), 20);
		$('.tabs li').removeClass('current');
		$(this).parent().addClass('current');
		return false;
	}
})
The above code adds some events once we click any of the anchor tags inside our li tags. It first checks that if the container we’re clicking for has a “current” class – we immediately exit (by calling return false). If it doesn’t, we run a function called “showImage” (which we haven’t built yet). It also removes ANY “current” class on ALL li tags, then adds “current” ONLY to it’s parent.
The showImage() Function
We create functions so we can reuse it anywhere in our code. The showImage() function simply changes the z-index property and opacity of the image container.
function showImage(img, duration){
	$('.container').removeClass('current').css({
			"opacity" : 0.0,
			"zIndex" : 2
			});
	img.animate({opacity:1.0}, duration, function(){
		$(this).addClass('current').css({zIndex:1});
	});
}
Place the above code outside of the document.ready clause (but inside our script tags). You notice that showImage() accepts two parameters – the image and duration. In our previous click event – we pass “c” – which was the “href” value of whichever anchor tag we clicked. We also pass “20” – which means 20 milliseconds.
The rotateImages() Function
Now we want to automatically cycle through the large and small images. We create two functions for this – rotateImages() and runRotateImages(). The main one – rotateImages() does all of the work:
function runRotateImages(){
  function rotateImages(){
    var curPhoto = $("div.current");
    var nxtPhoto = curPhoto.next();
    var curTab = $(".tabs li.current");
    var nxtTab = curTab.next();
    if (nxtPhoto.length == 0) {
      nxtPhoto = $('#featured div:first');
      nxtTab = $('.tabs li:first-child');
    }
    curTab.removeClass('current');
    nxtTab.addClass('current');
    showImage(nxtPhoto, 300);
  }
	theRotator = setInterval(rotateImages(), 4000);
}
It first looks for the list items, and container with the “current” class in them. Note that this could be the first – or anyone of them once we click. Then it checks if there’s no div after it by checking length “(nxtPhoto.length == 0)”, and goes back to the first list item and div if there’s none.
Again, it removes “current” class and adds it to the next. Finally, we run the “showImage()” function and pass “nxtPhoto” and 300 milliseconds. As you might have guessed, runRotateImages() simply runs rotateImages(). But it is wrapped in setInterval() and assigned to a variable “theRotator”. This will allow us to pause and proceed with our animation at any given time.
Let’s add the call to our two functions inside the document.ready clause:
runRotateImages();
var theRotator;
  $("#featured").hover(
	function(){
          clearTimeout(theRotator);
	},
	function(){
	  runRotateImages();
	}
  )
The above runs our main animation, then we create a pause on hover() on top of our main div by using “clearTimeout()”. It proceeds to our main function on hover out.
We can’t preview any of our code as of yet – we can’t really see improvements at this stage. Let’s beautify our work with some styles. That’s coming up next.
Some CSS Magic
Here we are, the final part of our exercise. If you’ve stuck with me all this time – you guys are true web devs. So I’m not going to explain what the style does – you can figure that out for yourself. Wrap the code below in a set of style tags:
#featured{
	width:518px;
	padding: 18px 120px 10px 21px;
	background:  #ebebeb !important;
	position:relative;
	border:1px solid #ccc;
	height:434px;
	background:#fff;
	margin-bottom:35px;
	border-radius:6px;
	-moz-border-radius:6px;
	-webkit-border-radius:6px;
}
#featured ul.tabs{
	position:absolute;
	top:18px;
	left:538px;
	padding:0;
	margin:0;
}
#featured ul.tabs li{
	font-size:10px;
	color:#666;
	line-height:10px;
	height:75px;
	color:#333;
	overflow:hidden;
	width:96px;
	background:#fff;
	margin-bottom:11px;
	position:relative;
}
#featured ul.tabs li a.title{
	position:absolute;
	z-index:5;
	color:#fff;
	font-family:arial;
	bottom:7px;
	width:96px;
	text-align:center;
	text-shadow:1px -1px 0 #000;
	text-decoration:none;
}
#featured ul.tabs li img {
	width:96px;
	height:75px;
	opacity:0.5;
	z-index:3;
}
#featured ul.tabs li.current img, #featured ul.tabs li img:hover {
	opacity:1.0;
}
#featured div.container img {
	height: 420px;
    width: 500px;
	position:absolute;
}
#featured div.container {position:relative; z-index:0;}
#featured div.container.previous {z-index:1;}
#featured div.container.current {z-index:2;}
#featured h2{
	font-size:40px;
	font-family:Arial;
	color:#fff;
	padding:5px 5px 5px 12px; margin:0;
	overflow:hidden;
	line-height:65px;
	text-transform:uppercase;
	height:50px; overflow:hidden;
	position:absolute;
	top:350px;
	text-shadow:1px -1px 0 #000;
	text-align:center;
	letter-spacing:-1px;
	width:475px;
}
Simply put, the CSS arranges all of the big images into an absolute position – so they’re all stacked up on top of each other. The list items are also positon – but to the right of the large images. Additional styles are added to the current list items: less opacity on the inactive ones. This gives a nice touch to our animation. The rest are styles related to the demo file.
Conclusion
There are no download files for this tutorial – you can simply go to the demo and view it’s source and copy it. My intentions are for you to actually follow the above tutorial and do it yourself. Also check out these Image Rotators that are have different approaches code-wise, but the final output is somewhat similar.

The reason I ask is, I’m trying to modify Agency theme to take the first image in a post instead of the Featured Image (I want a different thumbnail displayed than what is shown in the slider). I haven’t had much luck so far, though it might be more complex than realistic.
had fun writing this tutorial. hope you find it useful
Quick question. What modifications have to be done to make it fade from the previous one to the next one instead of fading up from white? I’ve been piddling with it for way, way, way too long…
You should be able to play with the .css transitions in the showImage() function. Maybe .animate() it instead and test opacity settings etc.
That’s what I’ve been doing, but the function just prior to fading in the image sets all images to opacity 0.0 and zIndex 2, including the one I want to fade up the next one in front of. Is there a way to keep that one from getting blanked out like the rest? I even tried passing a second variable in the showImage() function (current and next) and couldn’t figure it out.
maybe try positioning? I’m not so sure – I have to play with it myself. Be sure to post your solution here though.
Will do. Thanks!
Play around with the showImage() function – instead of opacity to 0.0, maybe do the opposite.
if possible, please provide a download link for this tutorial.
sorry i don’t have a download for this. my intent is for you to follow the steps
thanks for that
it took me a lot of time , but i finally made it into this:
http://i.imgur.com/YwnI8Wy.png
it was easier after a took a shower to refresh my mind lol
thank you very much
my next step is smooth the image transitions
thats so awesome!
How did you go about making the description a different text style then the H2 header?
Scratch that, I got it,
Hi!
need help about thumb images i want i to put outside the #feature css and make it horizontally . hard to display the div images horizontally
How hard would it be to make the thumbnails scrollable with say 10 images?
Yes, this is a great idea! Have you found an answer to this already? Would you be so kind to share this?
it shouldn’t be that hard. You just need to set the css property of your thumbnail container to overflow: auto
I change click image by hover and i see the bug, but i don’t understand to fix that. When u hover some image and hover out of #featured, try that some time and when u hover a image, the slider will not stoped? how to fix that thank 🙂
What would be the easiest way to add an external link to either the photo or the tag on the photo. I want each image or headline to link to another page on our site. I have been trying for a while and the link keeps getting out of order.
Thanks
You can add a new attribute for each link item:
…
and it the part where you’re creating the large images, do something like:
var theLink = $(this).attr(‘data-item’);
$(‘#handle’ + e).append(‘a href=”‘+theLink+'”>’ + t + ‘/a>’);
Thanks for the reply Michael. In my case I have 3 images. I tried what you posted and the link works correctly on the first photo but once it rotates, it pulls the wrong link, in my case the link from the 3rd picture when the second picture appears. It continues being out of order as it rotates through. The first link never comes back as it rotates through, just the second and third on the wrong picture. The text is correct, just not the link. Any ideas?
Thanks again for your help!
can you paste your code to http://pastebin.com/
Yes, here it is: http://pastebin.com/Rdcnt0ad
Hello Michael,
Need your help please !
I tried the exact same code and still not working for me.
here’s the code:
Image Rotator with jQuery
Condo One
Condo Two
Condo Three
Condo Four
Condo Five
Condo Six
$(document).ready(function(){
	$('.container').each(function(e){
		if(e == 0){
			$(this).addClass('current');
		}
		 $(this).attr('id', 'handle' + e);
	})
	$('.tabs li').each(function(e){
		if(e == 0){
			$(this).addClass('current'); //adds class current to 1st li
		}
		$(this).wrapInner(''); //wraps list items in anchor tag
		$(this).append(''); //creates img tag
		$(this).children('a').attr('href', '#handle' + e);//adds href to the anchors
		y = $('#handle' + e + ' img').attr('src'); //grabs src from large pix
		$(this).find('img').attr('src', y); //appends src to small pix
		t = $(this).children('a').text();
		$('#handle' + e).append('' + t + ''); //adds h2 and text to big images
	})
	$('.tabs li a').click(function(){
		c = $(this).attr('href');
		if($(c).hasClass('current')){
			return false;
		}else{
			showImage($(c), 20);
			$('.tabs li').removeClass('current');
			$(this).parent().addClass('current');
			return false;
		}
	})
	runRotateImages();
	$("#featured").hover(
		function(){
			clearTimeout(xx);
		},
		function(){
			runRotateImages();
		}
	)
})
function showImage(img, duration){
	$('.container').removeClass('current').css({
			"opacity" : 0.0,
			"zIndex" : 2
			});
	img.animate({opacity:1.0}, duration, function(){
		$(this).addClass('current').css({zIndex:1});
	});
}
function rotateImages(){
	var curPhoto = $("div.current");
	var nxtPhoto = curPhoto.next();
	var curTab = $(".tabs li.current");
	var nxtTab = curTab.next();
	if (nxtPhoto.length == 0) {
		nxtPhoto = $('#featured div:first');
		nxtTab = $('.tabs li:first-child');
	}
	curTab.removeClass('current');
	nxtTab.addClass('current');
	showImage(nxtPhoto, 300);
}
function runRotateImages(){
	xx = setInterval("rotateImages()", 4000);
}
#featured{ width:518px; padding: 18px 120px 10px 21px; background: #ebebeb !important; position:relative; border:1px solid #ccc; height:434px; background:#fff; margin-bottom:35px; border-radius:6px; -moz-border-radius:6px; -webkit-border-radius:6px; } #featured ul.tabs{ position:absolute; top:18px; left:538px; padding:0; margin:0; } #featured ul.tabs li{ font-size:10px; color:#666; line-height:10px; height:75px; color:#333; overflow:hidden; width:96px; background:#fff; margin-bottom:11px; position:relative; } #featured ul.tabs li a.title{ position:absolute; z-index:5; color:#fff; font-family:arial; bottom:7px; width:96px; text-align:center; text-shadow:1px -1px 0 #000; text-decoration:none; } #featured ul.tabs li img { width:96px; height:75px; opacity:0.5; z-index:3; } #featured ul.tabs li.current img, #featured ul.tabs li img:hover { opacity:1.0; } #featured div.container img { height: 420px; width: 500px; position:absolute; } #featured div.container {position:relative; z-index:0;} #featured div.container.previous {z-index:1;} #featured div.container.current {z-index:2;} #featured h2{ font-size:40px; font-family:Arial; color:#fff; padding:5px 5px 5px 12px; margin:0; overflow:hidden; line-height:65px; text-transform:uppercase; height:50px; overflow:hidden; position:absolute; top:350px; text-shadow:1px -1px 0 #000; text-align:center; letter-spacing:-1px; width:475px; }I m not able to post the html file
Can you paste to https://jsfiddle.net/ so we can run your code?
I had posted the link so you can take a look at the code.
https://jsfiddle.net/mdLs2fm2/
You have to load the assets so the JSfiddle can run. http://doc.jsfiddle.net/
I m not sure i understand you meant by saying to load the assets.
It does not work locally on my computer.
I meant to load the assets to the JSFiddle such as jQuery and making the images absolute url. https://jsfiddle.net/mdLs2fm2/6/