So our Company wanted to build a Timeline. One that shows our projects throughout the years, decades even. One that is sleek, modern and responsive. We’re already running WordPress, and have Bootstrap installed. So this shouldn’t be too bad. It turns out – it was a pretty fun project to build.
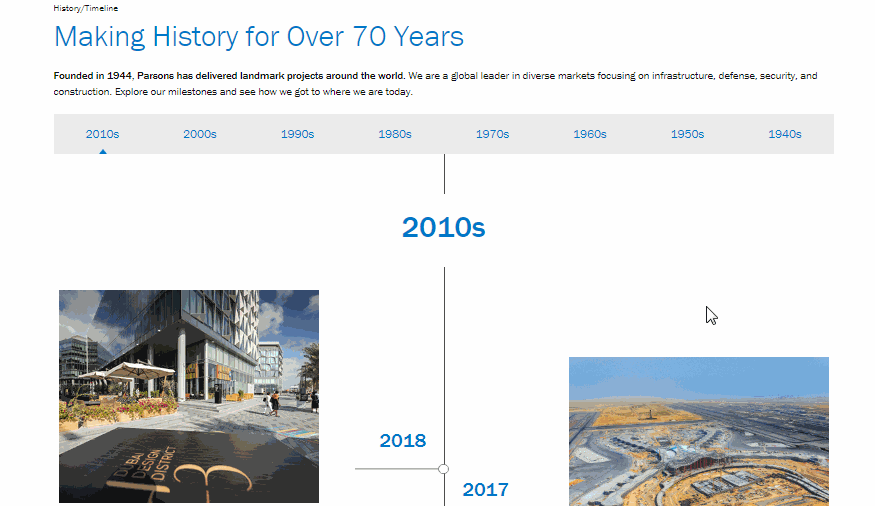
Our in house designers are responsible for the design of this page. It’s a little bit of Facebook’s original timeline layout – but a lot simpler and minimalist. Here is a preview of how it looks:
In a nutshell, this is what we’re going to accomplish: We’re going to use custom post types (CPT) for each entry in the Timeline. We’re grabbing them via JavaScript – using the WP Rest API as the endpoint. We’re also using Boostrap’s grid system – so our timeline behaves well in mobile.
We are going to build everything as part of the theme. For more advanced users – you can also build it as a plugin.
Note that you have to be familiar with WordPress, PHP and Front end to follow. There is no download for this – you simply have to follow along.
Ready to get started? Let’s begin:
The Back-End
First off, let’s take care of the data. We need to register the CPT with WordPress and make sure we have the right custom fields. Actually, we only have one custom field necessary – and that is the year. The year is what the timeline is sorted by (newest to oldest).
Open up functions.php in your theme. First let’s add the CPT initialization.
function registerTimelineCPT() {
        $labels = array(
            'name' => __( 'Timeline' ),
            'singular_name' => __( 'Timeline' ),
            'add_new_item'       => __( 'Add New Timeline'),
            'new_item'           => __( 'Timeline'),
            'edit_item'          => __( 'Edit Timeline'),
            'view_item'          => __( 'View Timeline'),
            'all_items'          => __( 'View All'),
        );
        register_post_type( 'timeline',
            array(
                'labels' => $labels,
                'public' => true,
                'has_archive' => false,
                'rewrite' => false,
                'publicly_queriable' => true,
                'exclude_from_search' => true,
                'show_ui' => true,
                'show_in_nav_menus' => false,
                'show_in_menu' => true,
                'show_in_admin_bar' => false,
                'menu_icon' => 'dashicons-backup',
                'show_in_rest' => true,
                'public' => false, //removes the "permalink"
                'supports' => array(
                    'title',
                    'excerpt',
                    'thumbnail',
                    'custom-fields'
                )
            )
        );
        //REMOVES COMMENTS
        remove_post_type_support( 'timeline', 'comments' );
}
add_action( 'init', 'registerTimelineCPT' );
Above, we’re simply creating our CPT called “Timeline”. We’re setting up the labels, what it supports and what it doesn’t support. Upon logging in you should see a “Timeline” in your admin area.
Now for the custom fields – you can easily add this the default way according to WordPress. In my case, I wanted to make it easier for the users to update – so I’m using this plugin called “Meta Box“.
Our custom field is now easier to set up and become much cleaner to the users.
If you have MetaBox installed, adding the field is as simple as below. This goes into your functions.php.
function createMetaBoxes($meta_boxes ){
$prefix = 'tl_';
$meta_boxes[] = array(
'id' => 'timeline_metabox',
'title' => esc_html__( 'Other', $prefix ),
'post_types' => array( 'timeline' ),
'context' => 'normal',
'priority' => 'low',
'autosave' => true,
'fields' => array(
array(
'name' => esc_html__( 'Timeline', $prefix ),
'id' => 'timeline_year',
'label_description' => esc_html__( 'Year', $prefix ),
'type' => 'range',
'min' => '1930',
'max' => date("Y"),
'step' => 1,
'std' => date("Y"),
)
)
);
return $meta_boxes;
}
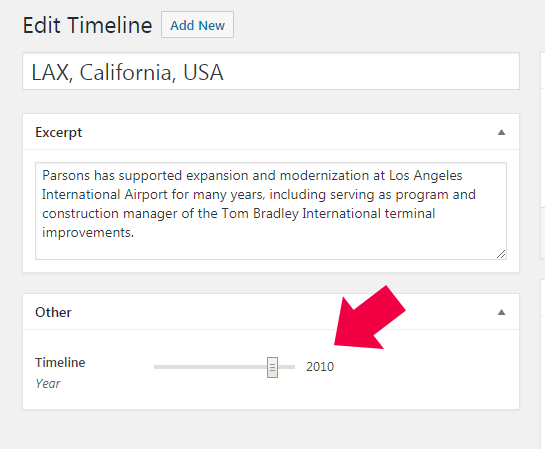
add_filter( 'rwmb_meta_boxes', 'createMetaBoxes' );Now if you go to the Timeline page, you should see our nice range slider:
We’re also using the following default WordPress fields:
- Title
- Excerpt
- Featured Image
So as you’re following along, go ahead and add several timelines and make sure these fields are filled out.
REST Endpoint
Before we can call our Timelines through REST, we have to do some setup. Still in functions.php, add the code below:
function restProperties(){
	register_rest_field( 'timeline',
		'timeline_year',
		array(
		   'get_callback' => 'registerRestCb',
		   'update_callback' => null,
		   'schema'          => null,
		)
	 );
	function registerRestCb($object, $field_name, $request){
		return get_post_meta( $object[ 'id' ], $field_name, true );
	}
}
add_action( 'rest_api_init', 'restProperties');
So the above makes the ‘timeline’ available as and endpoint in REST. Also, we’re adding the ‘timeline_year’ as a property in the response. To find out more about WP REST API, check their documentation.
Now, when you hit the endpoint: YOURURL +’/wp-json/wp/v2/timeline?_embed&per_page=100‘, you should now see data as a JSON string. This is enough for us to work with in our Front End. Let’s go do that now.
The Front-End
Before we continue, I forgot to mention the libraries that we need to work with:
- jQuery
- Bootstrap
- Handlebars
Markup
I’m going to add the markup first (the handlebar templates), then we’ll move on to the logic.
This is the main template:
<script id="timeline-template" type="text/x-handlebars-template">
    {{#each this}}
    <div class="decade-wrap" id="decade-{{decade}}">
    <h1>{{decade}}s</h1>
    {{#each @this}}
        <div class="col-lg-6 col-md-6 col-sm-6 col-xs-12 timeline-item timeline-index-{{@index}} timeline-{{leftOrRight @index}}">
            <div class="timeline-year">{{year}}</div>
            <div class="timeline-inner-wrap col-lg-8 col-md-8 col-sm-8 col-lg-12 {{pull @index}}">
                <div class="timeline-thumbnail" style="background:url('{{img}}') no-repeat #ccc">
                </div>
                <div class="timeline-title">{{title}}</div>
                <div class="timeline-excerpt">{{{excerpt}}}</div>
            </div>
        </div>
        {{{closeWrap @index}}}
    {{/each}}
    </div>
    {{/each}}
</script>
As you can see, we’re using the Bootstrap col classes to make each item responsive. We’re also using pull classes – so the alternate item will be pulled to the left.
The decades scroller:
<script id="timeline-decades-template" type="text/x-handlebars-template">
{{#each this}}
    <div class="timeline-decades-link-item decade-{{decade}} {{showingOrNot @index}}">
            <a href="#decade-{{decade}}">{{decade}}s</a>
    </div>
{{/each}}
</script>
Nothing fancy here, just a list of decades that is clickable.
Lastly, let’s build the wrapper:
<div class="timeline-decade-links-wrapper">
  <div class="timeline-decade-links">
       <div class="getting-items">Getting Items</div>
  </div>
</div>
<div class="timeline-wrapper"></div>
<div class="show-more-wrap">
   <a href="#"><img src="showmore.png"></a>
</div>
The above markup simply holds the timelines together. It also has the text “Getting Items” – which acts as our loader – until our AJAX call completes. Also, we have a “show more” button – so that when clicked – the rest of the items appear in the bottom.
So the above is our HTML. Now we need JavaScript, which is described below.
Getting and Grouping the Items
This is where we pull the data from our REST endpoint, and pass it on to the handlebars templates that we’ve created. We also need additional logic – specifically grouping the decades together to build the scroller.
Let’s grab our items via .ajax():
$(document).ready(function(){
	$.ajax({
		url : '/wp-json/wp/v2/timeline?_embed&per_page=100',
		success : function(data){
                        console.log(JSON.parse(data));
			//TODO :compileTemplates();
			//TODO: bindDecadeScroller();
		},
		error : function(data){
			console.log('Error in fetching timeline...')
		}
	})
});
All things are happening inside the document ready handler. Now if you refresh your browser, you shall see our data in a parsed JSON object.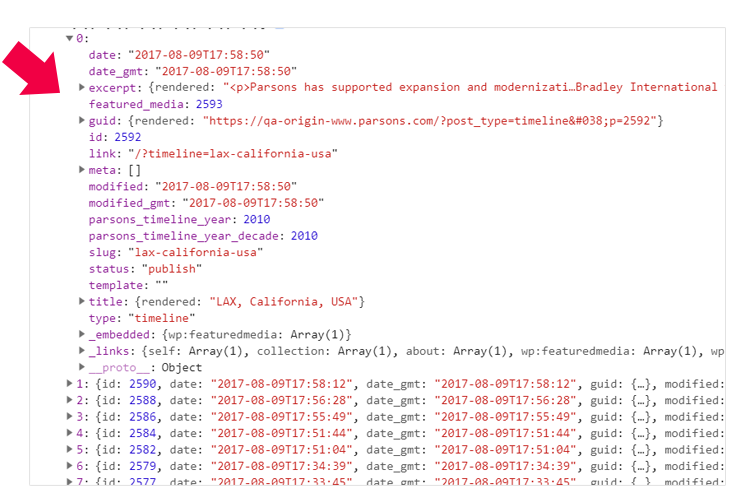
Now that we have our objects in place, remove the console.log() line that we have. We have 2 TODOS: functions that we haven’t built yet, namely compileTemplates() and bindDecadeScroller(). You can guess what both of them do.
Let’s add the first function compileTemplates():
function compileTemplates(data){
	var parsed = JSON.parse(data);
	if(parsed.length > 0){
		var obj = buildTimeline(parsed);
		var source  = $("#timeline-template").html();
		var source2 = $("#timeline-decades-template").html();
		var template = Handlebars.compile(source);
		var template2 =  Handlebars.compile(source2);
		$('.timeline-decade-links').html(template2(obj));
		$('.timeline-wrapper').html(template(obj));
	}
}
The above simply compiles the JSON data and hands it over to our templates. This alone should get our views going. But don’t refresh the browser yet. There are plenty of logic that still needs to happen.
Notice the new function in line 4 called “buildTimeline()“. On top of that, we have Handlebar helpers that we haven’t registered – so the browser will actually throw a fit. This will be covered in the section below “View Helpers“.
Let’s build the function called buildTimeline():
function buildTimeline(data){
    function comp(a, b){
        return b - a;
    }
    function compYear(a,b) {
        if (b.year < a.year)
            return -1;
        if (b.year > a.year)
            return 1;
        return 0;
    }
    function grabImg(el){
        var src = '';
        if(el._embedded){
            if(el._embedded['wp:featuredmedia']){
                src = el._embedded['wp:featuredmedia'][0]['source_url'];
            }
        }
        return src;
    }
    $.each(data, function(){
        $(this)[0].timeline_year = parseInt($(this)[0].timeline_year);
    })
    //add decade:
    $.each(data, function(){
        var year = $(this)[0].timeline_year;
        $(this)[0].timeline_year_decade = Math.floor(year / 10) * 10;
    })
    //group decades:
    var decades = [];
    $.each(data, function(){
        decades.push($(this)[0].timeline_year_decade);
    })
    var uniqueDecades = [];
    $.each(decades, function(i, el){
        if($.inArray(el, uniqueDecades) === -1) uniqueDecades.push(el);
    });
    decades = uniqueDecades.sort(comp);
    var clean = Array();
    var final = Array();
    $.each(data, function(i, el){
        var obj = {};
        obj.id = el.id;
        obj.img = grabImg(el);
        obj.title = el.title.rendered;
        obj.excerpt = el.excerpt.rendered;
        obj.year = el.timeline_year;
        obj.year_decade = el.timeline_year_decade;
        clean.push(obj);
    });
    clean = clean.sort(compYear);
    $.each(decades,function(i,el){
        var key = i;
        final[key] = Array();
        $.each(clean,function(x,xel){
            final[key]['decade'] = el;
            if(xel.year_decade == el){
                final[key].push(xel);
            }
        })
    })
    return final;
}
Okay this is the meat of our logic. We’re trying to grab all of the years in our timelines. And from each of those years, we need to calculate the decade, take out the duplicates and stuff them back to a final array, grouped by decade.
In lines 31-34 is where we calculate the decade, then stuffing it to a new property called “timeline_year_decade“. Then we’re doing a couple more loops to remove duplicates, sort and create a clean “decades” array – which we need for our final loop in lines 66-75.
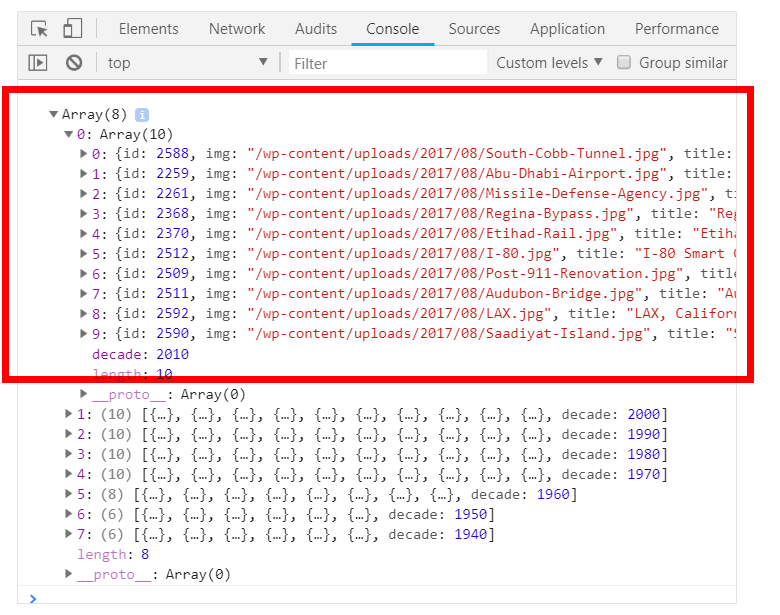
Refresh your browser and see what our “final” array looks like.
Now we our compileTemplates() is done, let’s go and register our helpers and do some CSS.
View Helpers
Now we have to do add more scripting to determine additional classes that makes our timeline look the way it does.
In case you haven’t noticed, our templates are sprinkled with helpers for handlebars. Let’s register those helpers now.
Handlebars.registerHelper('leftOrRight', function(index) {
	return index %2 == 0 ? 'left' : 'right';
});
Handlebars.registerHelper('closeWrap', function(index) {
   return (index+1) %2 == 0 ? '<div class="clearfix"></div>' : '';
});
Handlebars.registerHelper('pull', function(index) {
   return index %2 == 0 ? '' : 'col-lg-push-4 col-md-push-4 col-sm-push-4';
});
Handlebars.registerHelper('showingOrNot', function(index) {
	if(index == 0){
		return 'showing';
	}
});
The above are view helpers – that cooperates with the HTML templates that we just built. For instance, the “leftOrRight” helper – determines if a class of “left” or “right” is to be added. Below are the images for that:
Left Line:
![]()
Right Line:
![]()
Arrow up:
![]()
Vertical Line:
![]()
The Styles
Finally, the styles that make our timeline look good. I’m not going to walk through what each style does. I’m just going to add this as a reference for you to plugin. You might have a different style depending on your preference.
.timeline-wrapper {
    position:relative;
    z-index: 99;
}
.decade-wrap {
    overflow:hidden;
    clear:both;
    display:block;
    background:url('vertical_line.png') #fff repeat-y;
    background-position-x: center;
}
.decade-wrap:first-child {
    padding-top: 40px;
}
.decade-wrap:last-child{
    margin-bottom: 75px;
}
.decade-wrap h1 {
    text-align: center;
    background:#fff;
    padding:25px 0 35px;
    font-size:45px;
    color: #0077C8;
}
.timeline-thumbnail {
    background-position-x: center !important;
    background-position-y: center !important;
    background-size: cover !important;
    height:319px;
}
.timeline-item,
.timeline-inner-wrap {
    padding-left:0;
    padding-right:0;
}
.timeline-left {
    background:url('left_line.png') no-repeat right center;
    margin-left: 8px;
}
.timeline-right {
     margin-top: 100px;
    background:url('right_line.png') no-repeat left center;
    margin-left: -15px;
}
.timeline-inner-wrap {
    padding-top: 25px;
}
.timeline-year {
    position: absolute;
    top: 39%;
    font-size:30px;
    font-weight: 500;
    color: #0077C8;
}
.timeline-right .timeline-year {
    padding-left: 35px;
}
.timeline-left .timeline-year {
    right:0;
    padding-right: 34px;
}
.timeline-title {
    font-size: 19px;
    font-weight: 500;
    color: #000;
    padding-top: 15px;
    padding-bottom: 10px;
}
.timeline-decade-links {
    background:#ececec;
    min-height: 60px;
    display: flex;
}
.timeline-decades-link-item {
    width: 100px;
    margin: 0 auto;
    text-align: center;
    font-size: 18px;
    padding-top: 18px;
    height: 60px;
}
.timeline-decades-link-item a:hover,
.timeline-decades-link-item a:focus{
    text-decoration:none;
}
.timeline-decades-link-item.showing {
    background:url('arrow-up.png') transparent no-repeat center bottom;
}
.timeline-decade-links-wrapper {
    overflow: hidden;
}
.timeline-decade-links-wrapper.fixed {
    position: fixed;
    top: 0px;
    z-index: 110;
    left:0;
    width:100%;
}
.admin-bar .timeline-decade-links-wrapper.fixed {
    top:32px;
}
@media(max-width:1199px){
    .timeline-thumbnail {
        height:253px;
    }
    .timeline-item {
        background-position-y: 33%;
    }
    .timeline-year{
        top: 21%;
    }
}
@media(max-width:991px){
    .timeline-thumbnail {
        height:190px;
    }
    .timeline-item {
        background-position-y: 28%;
    }
    .timeline-year{
        top: 18%;
        font-size: 23px;
    }
    .decade-wrap h1 {
        padding: 14px 0 24px;
        font-size: 31px;
    }
}
@media(max-width:768px){
    .timeline-thumbnail {
        height:354px;
        width:410px;
    }
    .decade-wrap {
        background:none;
    }
    .decade-wrap:first-child {
        padding-top:0;
    }
    .decade-wrap h1 {
        padding: 0px 0px 0px 0px;
    }
    .timeline-right {
        margin-top: 0;
    }
    .timeline-item {
        background:#fff;
        margin-left: 0 !important;
        margin-right:0 !important;
    }
    .timeline-year {
        position: relative;
        padding-left: 0 !important;
        padding-right:0 !important;
    }
    .timeline-decade-links {
        display: none;
    }
}
@media(max-width:500px){
    .timeline-thumbnail {
        height:302px;
        width:auto;
    }
}
@media(max-width:375px){
    .timeline-thumbnail {
        height:242px;
    }
}
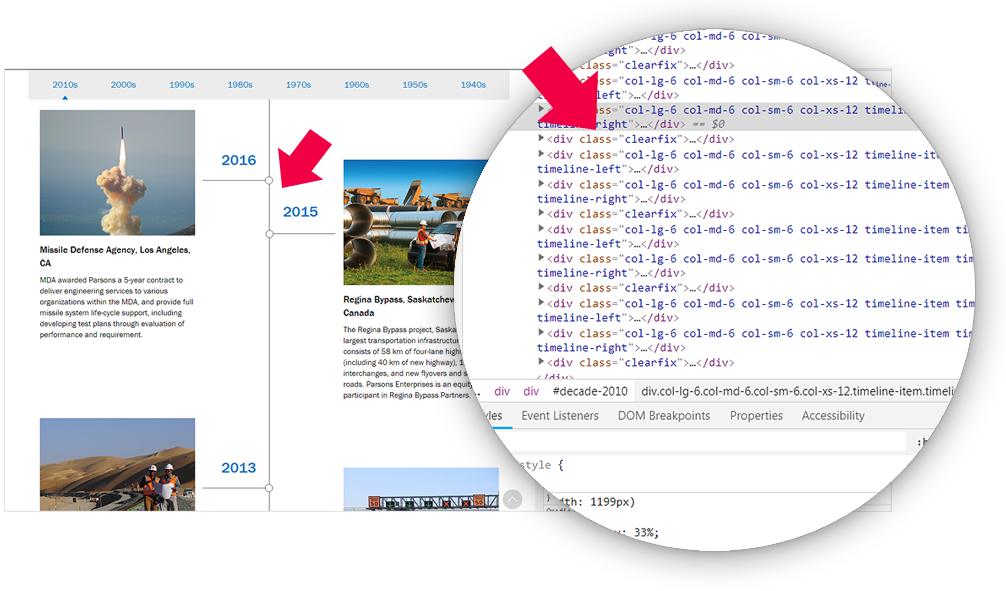
After our helpers apply the classes, our CSS and images in place – Bootstrap will take care of the rest. If you refresh, you should see your timeline. Inspect and you see our classes applied.
Finally, let’s go ahead and bind that scroller:
function bindDecadeScroller(){
	 $('.timeline-decades-link-item a').on('click',function(){
		var id = $(this).attr('href');
		var offset = ($(id).offset().top - 150) ;
		$('html, body').stop().animate({
			scrollTop: offset
		}, 1000);
		return false;
	})
}
This should have a smooth animating effect when you click on the decades on the scroller. Note that our timelines are grouped by decades, encapsulated in a DIV with the ID – of the decade. So when our scroller is cicked – it has the ID of the DIV in it’s href attribute.
So technically, even without our animation – it will know where to focus naturally.

We’re using .animate() to make that jump smoother. Check jQuery’s documentation on .animate for more information.
Conclusion
And there you have it. We’ve just build a pretty cool timeline – grouped by decades, with a scroller that focuses on the decade when clicked. This is also responsive – so it looks real good in a mobile device.
Note that this is a pretty basic timeline – which you can greatly enhance by adding other things. For example, you can add a modal for more details for each of the item. Or even multiple images per item – one that you can scroll left to right like a slideshow. There are many possibilities.
For the live page, check out the Parsons timeline page. I hope you enjoyed this tutorial. Leave your comments below.