For this session, I would like to show you how to build a “mini” single page application in SharePoint 2013. A single page application that is ALL Front-end code (JavaScript, HTML and CSS); while using SP’s REST services. We’re also using Bootstrap for the responsiveness and tab interface, Handlebars for the templating, as well as jQuery for everything else.
Note that this will require the following files:
- jquery.min.js
- bootstrap.min.js
- handlebars.min.js
- moment.min.js
- editor.js
- editor.css
- bootstrap.min.css
- font-awesome.min.css
The plugin already includes the above files via CDN.
We are building “Tab Containers“. Basically, content that is shown in different tabs in a page. The entire CRUD interface also comes with it – so we’ll be able to add, edit and delete tab content and items, all in one page (without refreshing).
Why is this Useful?
Well there really is no way to achieve this in SharePoint. If you want to add Tabs inside an SP page, you would have to paste the whole code inside their editor. But updating this is quite cumbersome to most users.
This solution provides you with a nice interface to manage your tab content, while the data is stored in an SP list. The good thing about this is, you can use multiple apps and utilize just one list. So if you convert this into a webpart or an app – you simply need one list per site to make it work.
Ready to get started? Also, I’m only going to discuss the meat of the logic. You will need some basic JavaScript and SharePoint to follow and complete this tutorial.
Create the List
The data for our application will be stored in a custom list. The list will basically contain four columns: 1) Title: which is the default title field, 2) content which is a Rich Text type 3) tab-order a single line text value 4) webpart-id – this will be the identifier for our webpart (in case you want multiple webparts in the site).
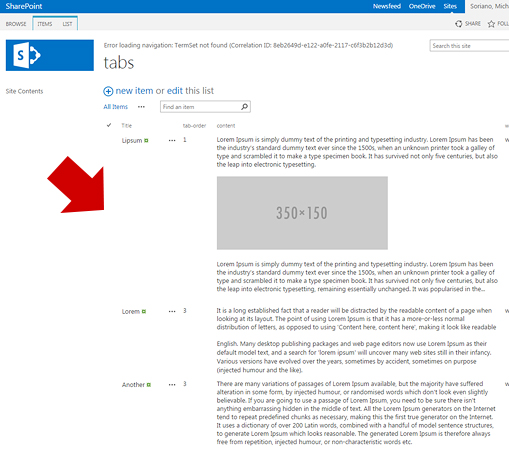
The title column will hold tab title, content is the contents of the tab, tab order is for ordering the tabs from left to right. You can go ahead and fill it out with dummy data for now, so we can go ahead and fetch the data for our front end. Note that that I have the list template also included in the Github page.
Fetch the Items
We are going to use a slight variation of the “Revealing Module” pattern to construct our code. This is especially useful when you are expecting your code to be reused multiple times in a page. In our case, users might want multiple of these web parts in a page, so a “modularized” approach is needed.
var SpTabs = function(){
   //ENTER REST OF CODE HERE
return {
    init : init,
    getContent : getContent
  }
}
As you can see, we are returning two public functions from our “SpTabs” object. The “init()” method will make the object unique per instance, while the “getContent()” will fetch the items for our view. Let’s build our init() function right below:
var init = function(obj){
    setListName(obj.listName);
    setWebPartId(obj.webPartId);
    setListItemEntityTypeFullName();
    checkPermissions();
}
Inside our “init()”, we have some setters. It simply sets our module up for execution. The setter functions are pretty self explanatory – and you can simply investigate what each of them does in the source code. Let’s continue getting our items:
var getContent = function(obj){
    var endpoint = "/_api/web/lists/getbytitle('"+listName+"')/Items?";
    endpoint = _spPageContextInfo.webAbsoluteUrl + endpoint + '$orderby=tab_x002d_order asc';
    endpoint += "&$filter=(webpart_x002d_id eq '"+webPartId+"')";
    var ajax = $.ajax({
      url: endpoint,
      method: "GET",
      headers: { "Accept": "application/json; odata=verbose" },
      success : function(data){
        items = data.d.results;
        buildTabsHtml();
        buildTabsContentHtml();
      },
      error : function(data){
        console.log(data);
      }
    });
    return ajax;
  }
This is the AJAX call that goes into our API to fetch our items. As you can see, we are returning the variable “ajax” from the getContent() function, in cases where we want to add additional stuff once the response is received. But the default behavior is inside the “success” method of jQuery’s $.ajax().
Note the two methods buildTabsHtml() and buildTabsContentHtml(), and our results are in our global var “items”. So we’re ready to build some output.
Output with Handlebars
Let’s create our Handlebars templates so we can use it to produce our content. In case you haven’t used it, Handlebars is a minimal template language for JavaScript. It just makes life easier. Note that we have to include our handlebars source to make it work. Also, we are using Bootstrap for our tab styles. So you have to include that in your source as well.
The code that will make this work is inside our two methods buildTabsHtml() and buildTabsContentHtml(). Let’s go ahead and build that now:
function buildTabsHtml(){
    var source = $("#tabs-navigation-template").html();
    var template = Handlebars.compile(source);
    $(getId() + '.tabs-navigation').html(template(items));
    //atach handlers
    $(getId()+'.tabs-navigation li a').on('click',function(){
      $(getId()+'.tabs-navigation li').removeClass('active');
      $(this).closest('li').addClass('active');
      var id = $(this).attr('data-id');
      $(getId()+'.tab-item').addClass('hidden');
      $(getId()+'div.tab-item[data-id="'+id+'"]').removeClass('hidden');
      if(id === 'addNew'){
        addNewForm();
      }
    })
  }
The above will output the content of our tabs. It also attaches the handlers to the tab navigation elements. Next up is the buildTabsContentHtml() method:
function buildTabsContentHtml(){
    var source = $("#tabs-content-template").html();
    var template = Handlebars.compile(source);
    Handlebars.registerPartial("tabForm", $("#tabs-content-form-template").html());
    $(getId() + '.tabs-content').html(template(items));
    $.each(items,function(i,item){
      $(getId()+'[data-id="'+item.Id+'"] .editable-content').Editor(EditorOptions);
      $(getId()+'[data-id="'+item.Id+'"] .Editor-editor').html(item.content);
    })
    $(getId()+'.save-changes').on('click',function(){
      var id =$(this).closest('.tab-item').attr('data-id');
      if(validateFields(id)){
        $(this).addClass('fetching').html(' Saving...');
        $(getId()+'.editmode').css({'opacity':'.4'});
        setTimeout(function(){
          var ajax = submitChanges(id);
          ajax.done(function(data, xhr){
              var ajax2 = getContent();
              ajax2.done(function(){
                $(getId()+'.tabs-navigation li a[data-id="'+id+'"]').trigger('click');
                addButton();
              });
          });
        },1000);
      }else{
        showErrorMessage(id);
      }
      return false;
    })
Now things got a bit hairy. First you’ll notice our handlebars compile – which is normal, but note the “registerPartial()” method. This means that we’re adding another handlebars template into our existing template. This is the form that handles our inline editing. I’m not going to post the code on here, instead you can see the #tabs-content-form-template from our text file – which simply contains a few input forms for our app.
Why use partials within templates?
This is another powerful feature of handlebars. This allows for more re-usability and “modularity” for your applications. In other words, we write once and re-use multiple times. In our case, the form can be reused multiple times across our application – in “edit” and “new” mode. This will become evident as you write along.
We’re also using a lightweight WYSWG editor called “Line Control“. Since we’re already using Bootstrap and FontAwesome, it just makes sense that we use a plugin that requires the same libraries. So this is what’s happening on lines 8-9 above: “.Editor(EditorOptions)”, where “EditorOptions” is declared on top of of our file as an array.
Insert, Update and Delete
Finally, we attach our “Save” and “Delete” buttons to do a couple of REST calls to our server when clicked. First our “Save” button is connected to our “submitChanges(id)” method (which takes care of both “edits” and “inserts”), while the next call is to “getContent()” – which is our main function to grab the tab items.
The “Delete” will also consist of two main REST calls, which is to delete and fetch the records. Our “deleteRecord()” function is shown below:
function deleteRecord(tab){
    var ajax = $.ajax({
       url: tab.__metadata.uri,
       type: "POST",
       headers: {
           "Accept": "application/json;odata=verbose",
           "X-RequestDigest": $("#__REQUESTDIGEST").val(),
           "X-HTTP-Method": "DELETE",
           "If-Match": tab.__metadata.etag
       },
       success: function (data) {
          console.log('record has been deleted');
       },
       error: function (data) {
          console.log('there was a problem with deleting the record');
       }
   });
   return ajax;
  }
While our “submitChanges()” method looks like so:
function submitChanges(id){
      var item = {
        "__metadata": { "type": ListItemEntityTypeFullName },
        "Title" :   $(getId()+'[data-id="'+id+'"] input[name="title"]').val(),
        "content" : $(getId()+'[data-id="'+id+'"] .Editor-editor').html(),
        "tab_x002d_order" : $(getId()+'[data-id="'+id+'"] input[name="tab-order"]').val()
      };
      if(id === 'addNew'){
        item.webpart_x002d_id = webPartId;
        var endpoint = "/_api/web/lists/getbytitle('" + listName + "')/items";
        ajax = $.ajax({
           url: _spPageContextInfo.webAbsoluteUrl + endpoint,
           type: "POST",
           contentType: "application/json;odata=verbose",
           data: JSON.stringify(item),
           headers: {
               "Accept": "application/json;odata=verbose",
               "X-RequestDigest": $("#__REQUESTDIGEST").val()
           },
           error: function (data) {
              console.log(data);
           }
       });
       return ajax;
      } //end addNew;
      var tabItem = findItem(id);
      ajax = $.ajax({
         url: tabItem.__metadata.uri,
         type: "POST",
         contentType: "application/json;odata=verbose",
         data: JSON.stringify(item),
         headers: {
             "Accept": "application/json;odata=verbose",
             "X-RequestDigest": $("#__REQUESTDIGEST").val(),
             "X-HTTP-Method": "MERGE",
             "If-Match": tabItem.__metadata.etag
         },
         error: function (data) {
            console.log(data);
         }
     });
     return ajax;
  }
Note that all of the REST calls all look similar, with a select few nodes that changes. First you’ll notice the “X-HTTP-Method” for edits is “MERGE” and “DELETE” for deleting. The rest are pretty much SharePoint REST API requirements – which you can find more on this page. Our “item” object is also mapped to the names of the list columns that we have. Depending on your list – you may need to modify this area as well.
In our UI, note the placement of our buttons and our form: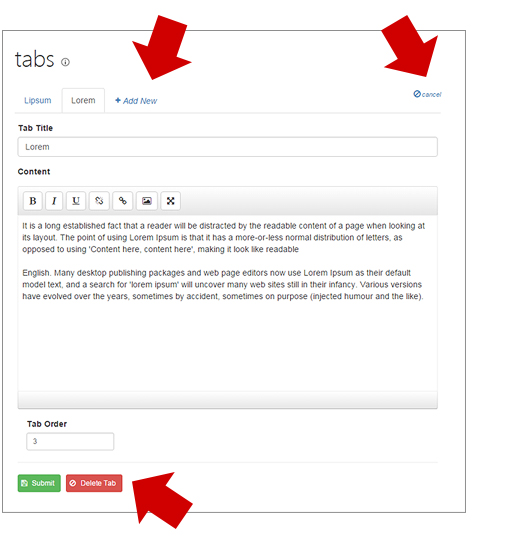
Lastly, you notice a couple of helper functions “getId()” and “findItem()”. The getId() simply returns our current div – with the “#” and a space as a string (or the CSS selector for the current div), while our findItem() loops through our global items object and returns the current item.
Moving forward, let’s look at a couple of important internal methods which includes our validation and error messaging mechanism.
Form Validation
Since we’re entering our data into our SharePoint lists through client side, we can implement a validation method using JavaScript as well. The cool thing about SP’s REST API has it’s own validation in the server side so all we have to worry about is the user experience.
function validateFields(id){
    errors = [];
    $('.error').remove();
    var title = $(getId()+'[data-id="'+id+'"] input[name="title"]');
    var content = $(getId()+'[data-id="'+id+'"] .Editor-editor');
    var tabOrder = $(getId()+'[data-id="'+id+'"] input[name="tab-order"]');
    if(title.val() == ''){
      var obj = {};
      obj.field = 'title';
      obj.message = 'Title cannot be empty'
      errors.push(obj);
    }
    if(content.html() == ''){
      var obj = {};
      obj.field = 'content';
      obj.message = 'Content cannot be empty'
      errors.push(obj);
    }
    if(tabOrder.val() == ''){
      var obj = {};
      obj.field = 'tab-order';
      obj.message = 'Tab order cannot be empty'
      errors.push(obj);
    }
    if(errors.length > 0){
      return false;
    }
    return true;
  }
Our very simple validation code is above. Note that this happens every time that “submit” button is clicked. So it simply goes through the fields – check for empty and puts the errors in an array. I’m not checking for anything else like valid data etc – and feel free to add your own rules. Simply keep pushing the error messages into our array when invalid. Our messaging is handled in the code below:
function showErrorMessage(id){
    $.each(errors,function(i,er){
      var field = '';
      if(er.field === 'content'){
        field = $(getId()+'[data-id="'+id+'"] .Editor-container');
      }else{
        field = $(getId()+'[data-id="'+id+'"] input[name="'+er.field+'"]');
      }
[the code above has been truncated due to an error w syntax highlighter… sorry]
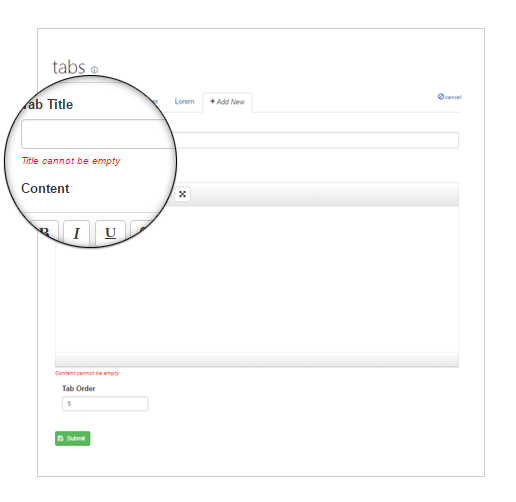
The following screenshot shows our validation code in action. Error messaging is placed underneath each label and at the same time. This way, users can see where they had made an error and fix. Remember to add your own rules as necessary.
Checking Permissions
Finally, since we’re not using the regular SharePoint process in updating a page with tabs, we need to come up with our own. See, the entity we’re updating is not the current page – but a list. So we need to check if the current user has permission to edit the list – and give them access to our newly created UI.
I found this great article on how to effectively do this – since Microsoft’s documentation is a bit vague.
We’re using the “effectiveBasePermissions” REST endpoint along with SP.BasePermissions() class – which we need from SP.ClientContext object. Yes, it’s a bit of a mess so simply check the code below:
function checkPermissions() {
    SP.SOD.executeFunc('sp.js', 'SP.ClientContext', function () {
      var call = jQuery.ajax({
          url: _spPageContextInfo.webAbsoluteUrl +
              "/_api/Web/lists/getbytitle('"+listName+"')/effectiveBasePermissions",
          type: "GET",
          dataType: "json",
          headers: {
              Accept: "application/json;odata=verbose"
          }
      });
      call.done(function (data, textStatus, jqXHR) {
          var permissions = new SP.BasePermissions();
          permissions.initPropertiesFromJson(data.d.EffectiveBasePermissions);
          var permLevels = [];
          for(var permLevelName in SP.PermissionKind.prototype) {
              if (SP.PermissionKind.hasOwnProperty(permLevelName)) {
                  var permLevel = SP.PermissionKind.parse(permLevelName);
                  if(permissions.has(permLevel)){
                        permLevels.push(permLevelName);
                  }
              }
          }
          // console.log(permLevels);
          if($.inArray('editListItems',permLevels) != -1){
            userCanEdit = true;
            addButton();
          }else{
            console.log('You dont have "editListItems" permissions on '+ listName);
          }
      });  //end done
    });
  }
We’re still using jQuery’s ajax to get information, though it’s wrapped inside a “SP.SOD.executeFunc()” method – which is Microsoft’s way of loading and executing internal scripts. What we get back is an array we’re calling “permLevels” This array contains all the permissions a user has against our list.
We’re simply looking for the “editListItems” – and if found, we’re show the button and let the user edit.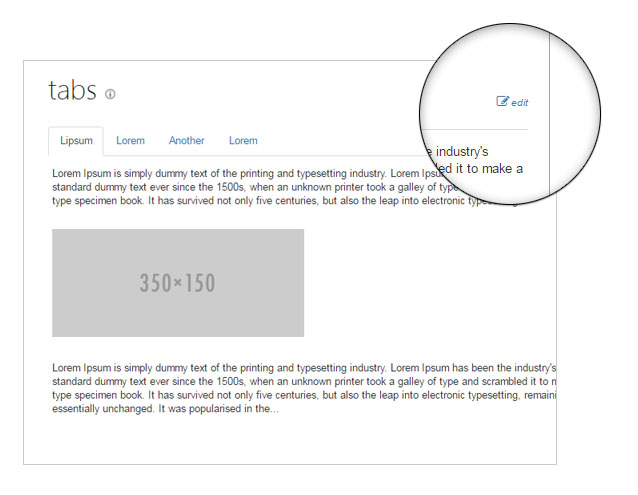
Final Steps
Our code is now complete. Note that there is not a single line of .NET code above – it’s all JavaScript, HTML and CSS. All server interactions are done through the REST API. This code can be applied whichever way you want to implement – may it be a custom web part, an app part or simply add the code to a Content Editor.
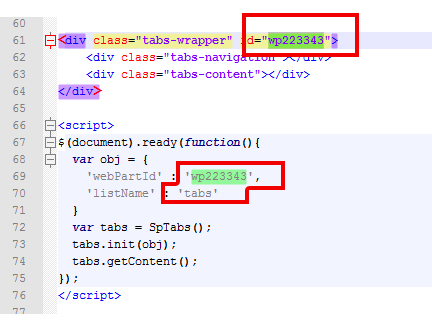
Remember to update the initialize settings like below: The important part is the “webPartId” and “listName” parameters – which connects the plugin to the data you need.
Once that’s done, simply reload the page and you should see your SPA in action. Note that the code editor I used is very basic – so you might need to go to the list itself when updating content.
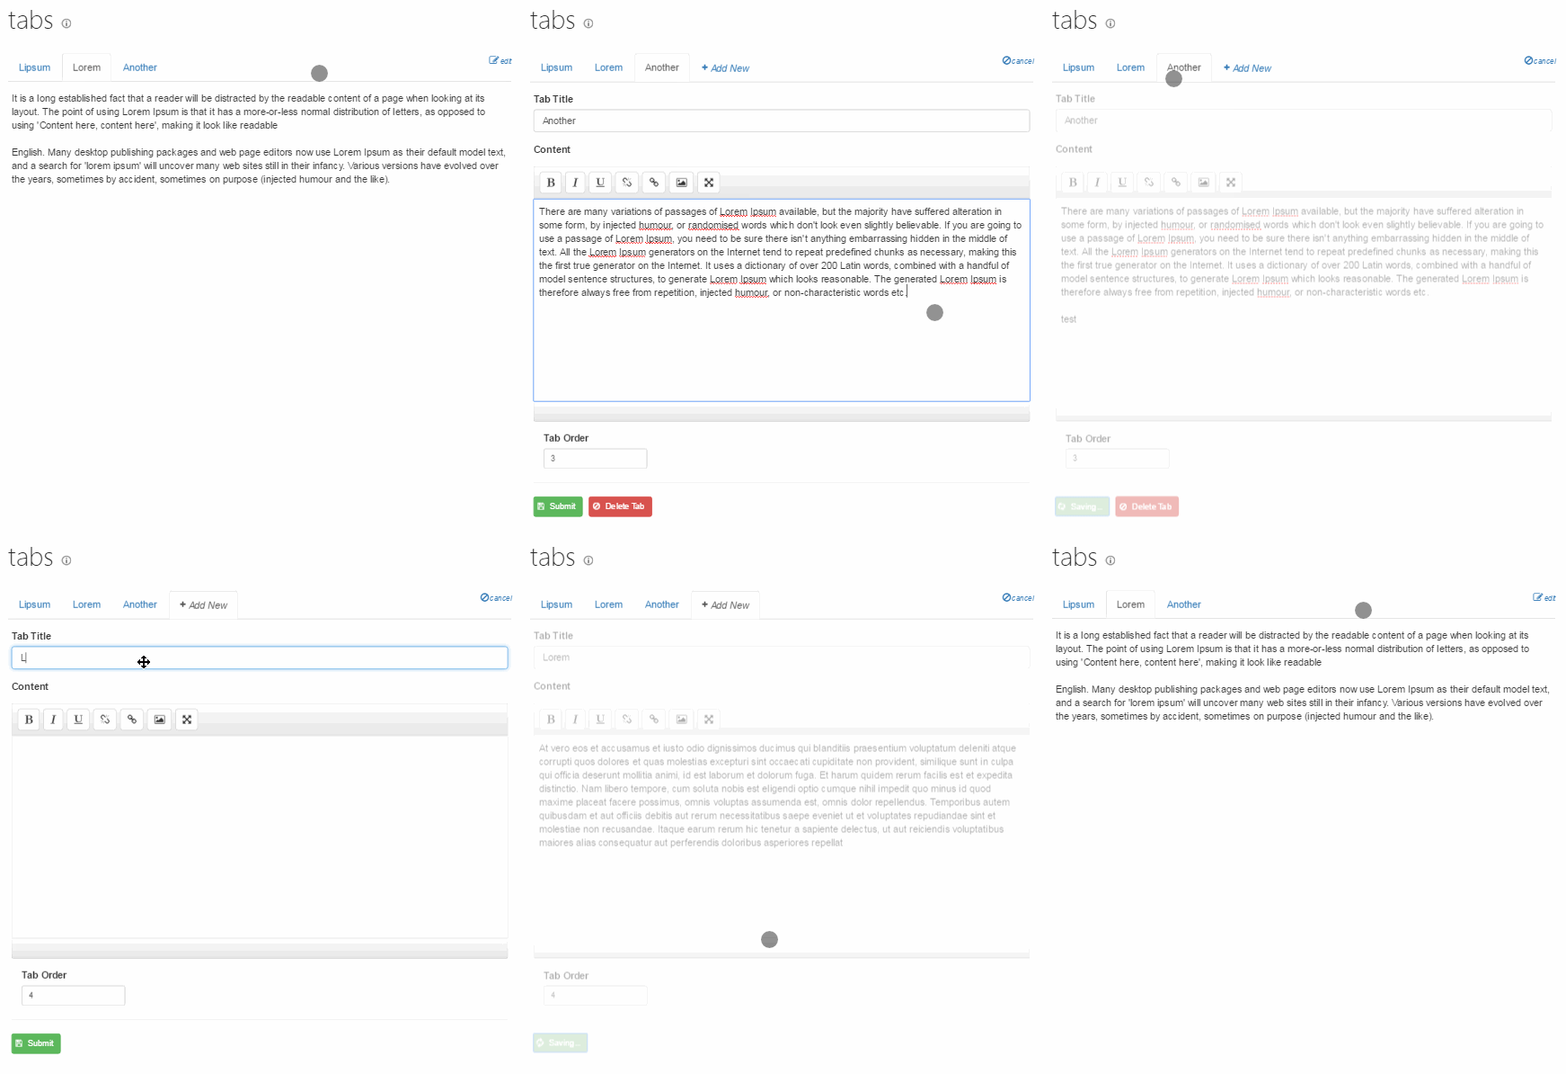
This editor was mostly designed for quick updates to your content.
Remember, the purpose of this article was really to expose you to the inner workings of REST and how to build a single page application right inside SharePoint with existing open technologies such as jQuery, Handlebars and Bootstrap.
Hope you enjoy this piece. Let me know your comments below.


nyc one but am just a begginer in this field and i really really. need assistance on my javascript coding..
Very nice article, can you please assist how to reassemble the pieces of vode, so that we can generate the same at our end.
Any Update ?
Hi Piyush,
I’m not entirely sure what you’re looking for. The entire code is in GitHub.
Really awesome article. Great to see that more functionality and power is moving over to the client side and in the process creating some really nice functionality. While reading through this I was thinking about possibly using it as a basis for creating responsive navigation for our SharePoint site. One question would have from a performance standpoint, if navigational items were list based, and a good number of the items would be security trimmed, what impact would it have on performance.
Further would be better to leverage the Search API for navigation?
Thanks
The security trimming is done in the server side. When you do a request – the server knows will know who you are – so the response is already trimmed.
A list based navigation system is good – that’s what we use in our organization.
Search API is a bit complicated to work with – and a little overkill if you already know the list and the columns you want to work with.
But don’t get me wrong – it is a powerful API. What Search API is really used for is it’s ability to search “in content”, like the contents of Word, Excel etc.
So if you know the list you want to target, plus the columns – then I think regular REST is good.
Thanks for the article.. How to find the webpart id ? Thanks !!
While I’m a veteran developer of on-premise SharePoint 2010 stuff.. we now have SharePoint Online 2016. I’m a little lost where to start. Can I do this by simply creating a new page in a sharepoint online site?
I am not sure. Haven’t tried in 2016.