I was recently given the task of updating the testimonials section of our company WordPress site. Imagine my disappointment to see a static page with a running list of paragraphs and author names. I said to myself, we can do way better.
Let’s take a glimpse of what we’re going to be building:
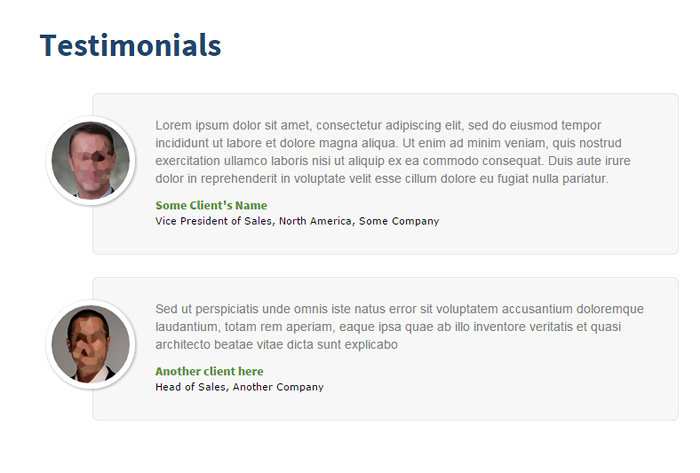
We will be creating a Testimonials section using “Post Types” and “Custom Fields” which will work in any self hosted WordPress. Note that you may need a little bit of PHP and CSS skills.
The Problem with a Static Page:
The biggest issue I have with the static page is that you can’t use these entries in any other part of the site. For example, we have a small widget in our homepage that shows just a single testimonial. That means we have to duplicate these puppies in the static page and the homepage. Another problem is that each time you need to need to add an entry – the page becomes longer and longer. Pagination becomes a bit crazy. I guess you can use “Next Page” shortcodes – but still, a bit archaic. Lastly, it is quite cumbersome adding paragraphs and editing HTML for each entry.
Enter “Post Types”.
Why “Post Types” and “Custom Fields”
Creating your own Post types offer so many advantages. The most obvious is that you can continue to use the familiar WordPress “Add New” and “Edit Post” interfaces – whenever adding a new entry. This is because they ARE the same as your regular “Posts” – just a different “type”.
Another advantage is that you can define almost every element of this new Post Type such as a custom slug, exclude it from the menu, exclude it from search, have it’s own archive and single templates – almost every custom feature is definable. Read the WordPress docs for more information on these custom attributes.
Custom fields on the other hand, are key / value pairs we can use for each of our testimonials. In our case, we would need a “client” and a “company”. We will also make it real user friendly by creating “Meta Boxes” for them. You’ll see what I mean as we dive deeper. So are you ready to get started?
Let’s begin.
Step 1) Create the “Testimonials” Post Type
First step is to edit your current theme’s functions.php file. If it doesn’t have one, you need to create it and place it in your theme’s root folder. A functions.php file is the default file that stores all of your theme’s PHP functions. Add the code below, and I’ll explain what it does right after.
function create_posttype() {
  $args = array(
    'labels' => array(
      'name' => __('Testimonials'),
      'singular_name' => __('Testimonials'),
      'all_items' => __('All Testimonials'),
      'add_new_item' => __('Add New Testimonial'),
      'edit_item' => __('Edit Testimonial'),
      'view_item' => __('View Testimonial')
    ),
    'public' => true,
    'has_archive' => true,
    'rewrite' => array('slug' => 'testimonials'),
    'show_ui' => true,
    'show_in_menu' => true,
    'show_in_nav_menus' => true,
    'capability_type' => 'page',
    'supports' => array('title', 'editor', 'thumbnail'),
    'exclude_from_search' => true,
    'menu_position' => 80,
    'has_archive' => true,
    'menu_icon' => 'dashicons-format-status'
    );
  register_post_type('testimonials', $args);
}
add_action( 'init', 'create_posttype');
The meat of the above code is the “register_post_type” method. This function takes 2 arguments, the name of your Post type, as well as an array of settings that you can use to tweak your post type. As you can see, we are assigning a custom slug to the “rewrite” key, as well as excluding it from search results through the “exclude_from_search” key. For a detailed explanation of the settings you can use, consult the WordPress API.
Save your functions.php and log in to the admin. You will see a “Testimonials” section appears in the left menu. Go ahead and add some entries and you should see your testimonials fill up the right side – similar to “posts”.
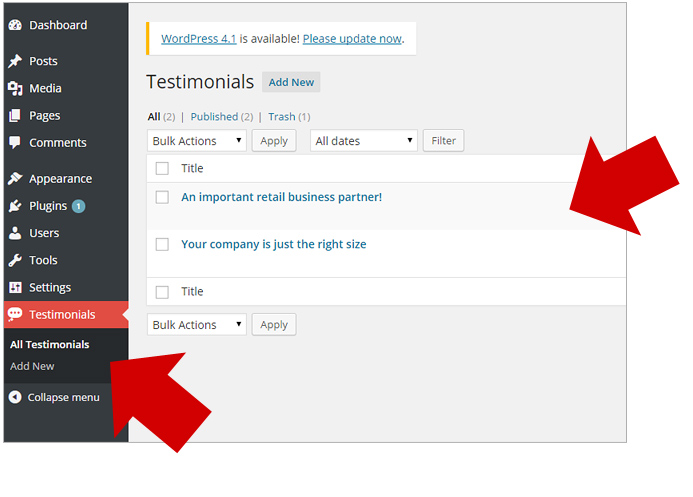
By now you should already see how powerful this type of functionality is. Let’s continue to the next step and add Meta Boxes for the needed Custom Fields.
Step 2) Create the Custom Fields / Meta Boxes
As mentioned before, we need a “Client Name” and “Company” field – to add to each of our testimonial. This is easily done through “Custom Fields”. But the default WordPress implementation is a bit tacky – so we need a better way of presenting it: this is done through “Meta Boxes”.
Let’s add the code below to our functions.php file:
function my_add_meta_box(){
add_meta_box( 'testimonial-details', 'Testimonial Details', 'my_meta_box_cb', 'testimonials', 'normal', 'default');
}
function my_meta_box_cb($post){
$values = get_post_custom( $post->ID );
$client_name = isset( $values['client_name'] ) ? esc_attr( $values['client_name'][0] ) : "";
$company = isset( $values['company'] ) ? esc_attr( $values['company'][0] ) : "";
wp_nonce_field( 'testimonial_details_nonce_action', 'testimonial_details_nonce' );
$html = '';
$html .= '';
$html .= '
';
$html .= '';
$html .= '';
echo $html;
}
function my_save_meta_box($post_id){
// Bail if we're doing an auto save
if( defined( 'DOING_AUTOSAVE' ) && DOING_AUTOSAVE ) return;
// if our nonce isn't there, or we can't verify it, bail
if( !isset( $_POST['testimonial_details_nonce'] ) || !wp_verify_nonce( $_POST['testimonial_details_nonce'], 'testimonial_details_nonce_action' ) ) return;
// if our current user can't edit this post, bail
if( !current_user_can( 'edit_post' ) ) return;
if(isset( $_POST['client_name'] ) )
update_post_meta( $post_id, 'client_name', $_POST['client_name']);
if(isset( $_POST['company'] ) )
update_post_meta( $post_id, 'company', $_POST['company']);
}
add_action( 'add_meta_boxes', 'my_add_meta_box' );
add_action( 'save_post', 'my_save_meta_box' );
So to explain the code above, we create three new functions. The first two are setting up the input fields. Function “my_add_meta_box()” is simply a wrapper for “add_meta_box()” which takes several parameters such as the title of the meta box, display name, the call back function (the other function), the post type etc.
The callback function my_meta_box_cb() is the HTML we output in our form. If you read carefully – it’s creating the labels and input fields, along with it’s default values and simply echoing it. Next is actually saving the values to the database.
We have my_save_meta_box(), which does several checks and exits if it doesn’t meet our requirements. Then we update / save through update_post_meta() methods.
Finally, we have a couple of actions – which hooks our functions to the WordPress internal methods.
Go ahead and click on a testimonial to edit. Notice our nicely formed meta boxes:
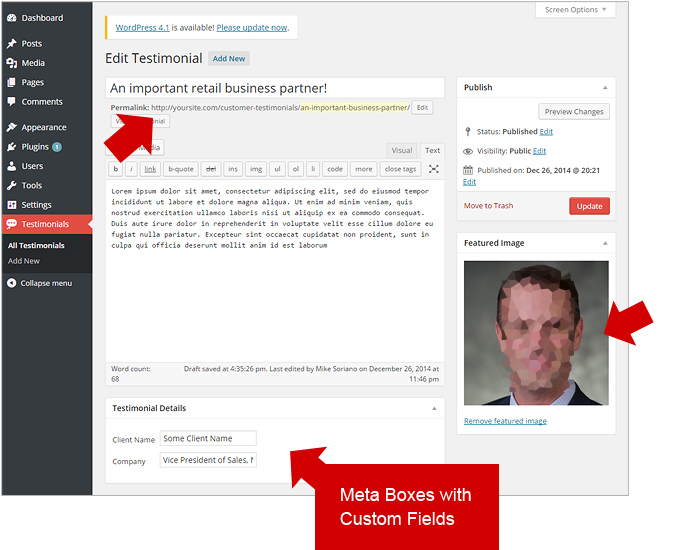
Let’s set a featured image on a testimonial by setting a post thumbnail. Note that your theme has to support this feature in order for the “Featured Image” box to appear. Also, see in our code above that we are setting “thumbnail” as one of the values in the “supports” key – which adds this functionality to our post type.
Again, consult the WordPress API for more information on enabling post thumbnails in your theme.
Step 3) Create the Output: The Testimonial Archive
Now we’re getting to the fun part – presenting our data. Our company needs a running list of testimonials, along with the author thumbnail, name and company. So we’re jumping straight to this view (we’re not going to worry about the single view since it’s not necessary in our case).
Create a new file in your theme folder and call it “archive-testimonials.php”. Add the following loop inside your new file.
Note that the above code is just for the “loop” of your file. You need to add the other template tags such as getting the header and footer etc. The above is the same as any other loop in WordPress. The only way that it knows how to grab the “testimonials” is through the file name “archive-testimonials.php”.
The styling for our Markup above
Now to achieve our round author thumbnails and containers, we need to add some CSS Magic. In your theme’s CSS file (usually called styles.css), append the code below:
.post-type-archive-testimonials h1 {
    color: #21486f;
    font-family: 'Source Sans Pro', sans-serif;
    font-weight: 700;
    margin-top:35px;
    margin-bottom:35px;
}
.post-type-archive-testimonials .testimonial-wrap {
    clear:both;
    min-height: 120px;
    background:#F7F7F7;
    margin-bottom:25px;
    padding:25px 35px 30px 70px;
    margin-left:60px;
    border-radius:6px;
    border:1px solid #E7E7E7;
}
.post-type-archive-testimonials .client-photo{
    float:left;
    width:100px;
    height:100px;
    border:6px solid #fff;
    border-radius:50%;
    box-shadow:1px 1px 5px #A8A7A7;
    position: absolute;
    left: 23px;
}
.post-type-archive-testimonials h2.post-title,
.post-type-archive-testimonials .client_name{
    color:#579241;
    font-family: 'Source Sans Pro', sans-serif;
    font-weight: 900;
    margin-top:0;
}
.post-type-archive-testimonials .company {
    font-family:verdana;
    font-size:11px;
    color:#000;
}
.post-type-archive-testimonials .post-excerpt {
    margin-bottom:0;
}
.post-type-archive-testimonials .testimonial-wrap .post-excerpt p {
    color:#838383;
}
As you can see from our code above, each CSS rule is prefixed by “post-type-archive-testimonials”. This is default behavior by WordPress, which is to append this class to the archive page of your custom Post type. This is very useful especially if you want to organize your CSS files efficiently.
This also opens up many possibilities including writing your CSS in an Object Oriented fashion. But that’s an entirely different topic.
Save your css file and navigate to your http://yoursite.com/testimonials. You should see our HTML and styles in full effect.
Let’s move on to creating a custom widget to show in different parts of our page such as the homepage.
Step 4) Create a Homepage Widget
So now we have data. We are successfully display them it a running list – which is the main “testimonials” page. Now we can use that same list – and display it in other sections of our site. I’ve seen this implemented in the sidebar, but in our case – we’re putting it in our homepage (since we’re using a custom home page template).
Now I know I mentioned “widget”, but I’m not really going to build an actual WordPress widget – which you can reuse anywhere in your site (which is the best way to do it by the way). But for the sake of this tutorial – which is getting too long, I’m simply going to output it in the page.
For a tutorial on how to create a WordPress widget based on your Post Type – I have a separate tutorial for that.
Now, in your homepage template (or sidebar, footer etc) – paste the following code:
The code above is simply HTML with a combination of PHP. The meat of this code is WP_Query() – which is a WordPress class that deals with special queries to the database. In our case, we want our post type “testimonials”, we only want 1 and we want the order to be “random”.
Note the $args array that sets up all of those requirements. Then we create an object called $testimonilas from the WP_Query() class – which we then execute like a normal WordPress loop.
Styles for our widget
Now that we have our widget that pulls just a single testimonial, we also want this presented it a different way than our archive page. Let’s paste the code below into our CSS file:
.testimonial-home h6 {
    background:#003658;
    border-radius:6px 6px 0 0;
    padding:12px 0 12px 20px;
    margin:0 0 0 20px;
    text-shadow:1px 1px 0 #000;
       color: #C4D8BC;
}
.testimonial-home h6 a {
     color: #C4D8BC;
}
.testimonial-home-inner {
    background:#F0F3F5;
    padding:35px 60px 42px 94px;
    border-radius:0 0 6px 6px;
    margin-left:20px;
    position:relative;
}
.testimonial-home-inner img {
    position:absolute;
    left:-30px;
    top:25px;
}
.testimonial-home-inner p {
    font-size:16px;
    line-height:24px;
    font-style:italic;
}
.testimonial-home-inner .client-photo{
    float:left;
    width:100px;
    height:100px;
    border:6px solid #fff;
    border-radius:50%;
    box-shadow:1px 1px 5px #A8A7A7;
}
.testimonial-home-inner p {
     color:#838383;
}
.testimonial-home-inner p.client_name {
    color:#579241 !important;
    font-family: 'Source Sans Pro', sans-serif;
    font-weight: 900;
    font-style:normal;
    margin-bottom:0;
}
.testimonial-home-inner p.company {
    color:#000 !important;
    font-family:verdana;
    font-size:11px;
    font-style:normal;
    line-height: 16px;
}
Save your CSS file and view your site homepage (or wherever you plugged the widget code in). If all is successful, you should see a box like below:
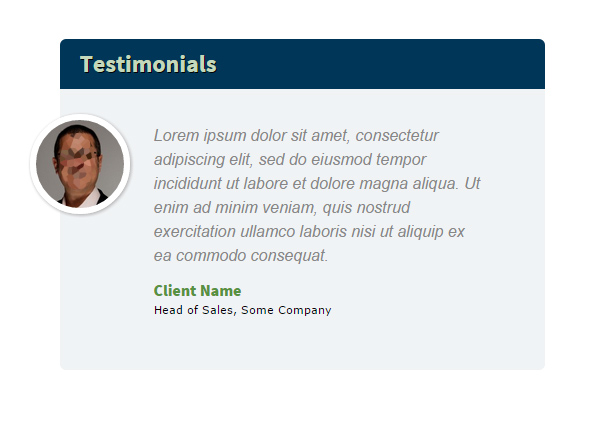
Note that the heading for this widget links to our “testimonials” archive page. Also, you also need to consider making them responsive by using a solid framework such as Bootstrap.
Conclusion
I think that covers it. We now have a working system on adding new testimonials to our company site. Now this task can be assigned to the editors of the site. All they have to do is add new entries – as if they were adding posts (which they’re already familiar with).
Oh, I almost forgot – the thumbnails for the client faces have to be a square. This is to make the perfect round shape – and make sure their faces are in the middle.


Hi..this is so great. But I have problem.
I want to put all testimonial list on homepage. How can I do that?
Step 4 above. But remove the “posts_per_page” parameter in the WP_Query call.
Hi..this is so great. But I have problem.
I want to put all testimonial list on homepage.
I have tried to make testimonials.php and call the archieve with
But it’s only show 1 testimonial. I want to show all testimonials in the homepage. How can I do that?
Sorry for the late response. But yes you can definitely do that – since the testimonials are a custom post type that you can query. As a matter of fact – see “Step 4” above – I’m already using WP_Query to query the post type = just don’t put a limit on the it.
How to show all testimonials in one page? for example in single post file. I have tried your tutorial, but it’s only show 1 testimonial per page
check your WP settings on post limits. it should use that by default.
I have added the loop to a new template file of my theme, and re-named the file to archive-testimonial.php, then set a testimonial page with that template, but nothing is loading.
Try to flush the permalinks. Go to settings > permalinks and click “save”
This is a fantastically useful article.
Thanks so much
I found this code after doing all the previous steps
although I added 3 testimonials
Testimonials
‘posts_per_page’ => 1,
‘orderby’ => ‘rand’
);
$testimonials = new WP_Query( $args );
// The Loop
if ( $testimonials->have_posts() ) {
while ( $testimonials->have_posts() ) {
$testimonials->the_post(); ?>
No testimonials found
Hi Michael, great tutorial.
I need to show more than one page of testimonials using the post page navigation. I can display multiple testimonials on a single page but the navigation always includes all posts, not just the testimonials.
Any ideas or suggestions on how to resolve this would be appreciated?
Thanks in advance.
Make sure you have your arguments to the WP_Query() class correctly. If it’s fetching all post types, make sure you’re only getting the post type you need. Go to this: https://generatewp.com/wp_query/ and build your query.
Also, paging is a bit of a challenge. Read up on http://www.billerickson.net/code/wp_query-arguments/
Thank you Michael, I will take a look at the links and give it a shot.
Or try this generator: https://www.wp-hasty.com/tools/wordpress-wp-query-loop-generator/
Great tutorial, thank you for explaining and posting the code!
Hi Michael,
I copied step 1 and step 2 into my functions.php and when I saved the changes, I got server error 500 and I cannot access my site at all. Any suggestions on how to fix that?
That’s an internal server error. You check the logs what it’s saying?
try replacing the ‘>’ with ‘>’ in the code
sorry, meant to say – try replacing the expanded version of the html character entities like ‘greater than’ and ‘ampersand’
Give me one good reason why I should write these testimonials with code instead of a page builder: https://www.youtube.com/watch?v=pvxFUZFzGK8
I’m thinking about a few reasons to use this method instead of a page builder.
– No plugins required: It’s applicable to sites that for some reason, doesn’t want to install a page builder.
– Good way to have the testimonials well organised.
– No need to enter editing the page when you have to add some new testimonials: It’s dangerous for some users (end users) editing the pages directly. With this method, adding or correcting a testimonial is simple as adding a new post, avoiding the possibility to move/change/delete contents of the page by mistake.
– Is also capable to assign/restrict this funcionality to other editors in the site through the user roles. No need to have the role to edit pages to write or correct a testimonial.
– Highly personalizable without limitations of the predefined page builder styles. As simple as editing the CSS classes and the php code.
But the page builder way it’s also a good way to show the testimonials if you don’t want to edit files into the theme.
I used this method into a child theme in some sites and I have to say it worked like a charm.
Hi, is there any way to create a shortcode from this to display a testimonial in visual composer or text widget for example ?
I’m sure there is. But it would have to be coded: https://codex.wordpress.org/Shortcode_API
Wow Its working correctly.Thank you so much
Thanks for sharing excellent informations. Your web site is very cool. I’m impressed by the details that you’ve on this website. It reveals how nicely you understand this subject. Bookmarked this website page, will come back for extra articles. You, my pal, ROCK! I found simply the info I already searched everywhere and simply could not come across. What an ideal website.
Thanks
Hi Michael!
Thanks for this good tutorial.
Everything worked as expected, except for one thing, the widget. I get some code as result of the query and it shows me “No testimonials found”
The code shown as result of the code is:
‘testimonials’,
‘posts_per_page’ => 1,
‘orderby’ => ‘rand’
);
$testimonials = new WP_Query( $args );
// The Loop
if ( $testimonials->have_posts() ) {
while ( $testimonials->have_posts() ) {
$testimonials->the_post(); ?>
‘client-photo’)); ?>
No testimonials found
I checked if is some bad character by mistake, but I can’t find it.
Can you help me find what i’m doing wrong?
Thanks
Hello there!
I already solved it.
Wordpress doesn’t accept PHP code inside the pages/posts made with TinyMCE or content builders. The only way I found to add this PHP code inside pages/posts is using a plugin called PHPCode Snippets. This plugin registers custom shortcodes that calls our PHP code and now everything is working OK.
Thanks for all!
No problem
How do you add a star ratings to the testimonials?
That would just be another custom field. But the challenge is coding it in the front end = making the UI seamless.
Hello, what a great article. I was trying to use it to display all testimonials on home page. I removed this code from example 4:
‘posts_per_page’ => 1,
‘orderby’ => ‘rand’
And got all testimonials listed, but only one photo would show up. How can I get them all listed, with the photo next to each on the home page?
Thank you so much! You have explained this so wee.
I’ve been following this tutorial and its all good till step 4. Is there something missing after this line?
Now, in your homepage template (or sidebar, footer etc) – paste the following code: …. (there is no code after this)
Appreciate your help.
how to get particular testimonial from admin menu for example five testimonial are present in admin menu page
when check any one then show testimonial..?????
Hi …I have created testimonial with 5 lines of paragraph..but it displays only 2 lines in my page.
Hi, Michael
I’ve got my functions in place and added my testimonials, but it looks like the wp_query code to display them is missing from your tutorial above… “Now, in your homepage template (or sidebar, footer etc) – paste the following code:”
There isn’t any code displayed. Would you mind adding that code back? I loved the tutorial, BTW!
thnx!
Yes – for some reason, my code syntax plugin messed up my older posts. I lost many of my code samples in my articles.
Hi Michael,
I noticed the same issue and would love to see the code to display this on a different page.
Thanks!
“Now, in your homepage template (or sidebar, footer etc) – paste the following code:”
No coding is showing up below this text in chrome.
Here’s the code for anyone who needs it:
Testimonials
‘testimonials’,
‘posts_per_page’ => 1,
‘orderby’ => ‘rand’
);
$testimonials = new WP_Query( $args );
// The Loop
if ( $testimonials->have_posts() ) {
while ( $testimonials->have_posts() ) {
$testimonials->the_post(); ?>
‘client-photo’)); ?>
No testimonials found
Can’t paste code in here, you can view it on way back machine instead https://web.archive.org/web/20170609193549/http://michaelsoriano.com/create-a-testimonials-section-for-your-wordpress-site-the-right-way