Okay its been a while since I last posted. Let’s continue with Barebones React WP theme. The last time we left off, we introduced the concept of “The Loop“. But we really didn’t get into what its all about. Let’s describe what this piece is doing.
In WordPress themes – there is the “The Loop“, where it’s a “catch all” for all of the post content at a given query. This may be a page, a post or a series of posts. It all goes to “The Loop“, where inside that loop – are methods that make retrieving post data easy. Inside the loop, we can do something like “get_the_ID()” or “the_title()” – which will output the post id or its title.
We’re trying to achieve the same thing in Barebones. We have “TheLoop” component – which we’ll be adding in our “partials” directory. This component will be used everywhere – in single posts, pages or archive pages such as search etc.
Previously, we were just outputting the slug in TheLoop. The modified version is shown below.
import React from 'react';
import WithConsumer from '../context/WithConsumer';
import ThePost from './ThePost';
const TheLoop = ({ context }) => {
    const posts = () => context.posts;
    const pos = posts();
    let results = '';
    if(context.appError){
      results = <div className="app-error">{context.appError}</div>;
    }else{
      if(pos.length === 0){
        results = <div className="no-results">no results</div>;
      }else{
        results = pos.map(function(item,i){
             return <ThePost key={i} index={i}></ThePost>
           })
      }
    }
    return (results);
};
export default WithConsumer(TheLoop);
There’s really not a lot going on. We are simply isolating the “loop” logic in this component. So we don’t have to do the same elsewhere. But the key points to see is we’re getting the results from our Context. And depending on the count of the result, if there’s more than 0, we – return the “ThePost” component (more on this later).
If there’s no results – we simply return a div with the text “no results”.
If there’s an error – return the error message.
ThePost
ThePost component has all of the methods necessary to output the post data. This resembles WP’s “the_post()” in PHP. In here, we have access to the context.posts, filtered by the index. The index is a prop that we pass coming from TheLoop. So now, each item is a post:
const ThePost = ({index,context}) => {
    const posts = () => context.posts;
    const item = posts()[index];
    let linkPrefix = item.type === 'page' ? '/page/' : '/post/';
    let theContent = '';
    switch(context.route){
        case '/': //if homepage,
        case '/search/:term': //or if search
        case '/category/:catid': //or if search
            theContent = item.excerpt.rendered; //show excerpt only
        break;
        default: //for single, pages - show entire content
            theContent = item.content.rendered;
        break;
    }
    return (
        <div id={'post-id-'+item.id} className={'post-item'}>
            <h1><Link to={linkPrefix+item.slug}>{item.title.rendered}</Link></h1>
            <PostMeta index={index}></PostMeta>
            <div className="post-content" dangerouslySetInnerHTML={{__html:theContent}}></div>
        </div>);
};
We have to determine if its a “post” or a “page” (line 6). This will match with the post/page route in our index.js.
Then we have a switch statement, that checks the route. If its an archive page (like search, category) – let’s output only the content excerpt. Otherwise – if its a single, let’s output the entire thing.
The PostMeta component is also a new component that we haven’t built yet. Let’s add that in a little bit. For now, let’s grab the data.
Context.js
Now there are a few things we need to do to our Context component for the loop to work. Remember in our loop, we’ve setup up the links using “Link to”. We need to map these links to right REST url endpoint – so we can get the right data and put it in the right data store.
Remember, all of the data is inside this one file. May it be posts, comments – even methods that manipulate this data is in this component. So this file is extremely important.
Let’s start by adding the containers for our state. In the constructor, add the following:
constructor(props) {
    super(props);
    let restType = this.getRestType(props.router.match.path);
    let route = props.router.match.path;
    let slug = props.router.match.params.slug ? props.router.match.params.slug : '';
    this.state = {
      slug : slug,
      restType : restType,
      route : route,
      posts : []
    };
  }
Our state now has the necessary containers for the data we need. Primarily the “posts” array is what we aim to fill. Let’s add some actions in our lifecycle hook: componentDidMount:
componentDidMount(){
    this.getPosts(this.buildUrl());
}
Let’s build a couple of functions – one to build the REST url endpoint, and the other to fetch the posts:
buildUrl(){
    let url = '/wp-json/wp/v2/';
    switch(this.state.restType){
      case 'page':
        url += 'pages/?slug=' + this.state.slug
      break;
      case 'post':
      default:
        url += 'posts/?slug=' + this.state.slug ;
        break;
    }
    return url;
  }
 getPosts (url){
    let self = this;
    Axios.get(url).then((response)=>{
      self.setState({
        posts : response.data
    }).catch(function(error){
      console.log(error);
      self.appError = 'An unexpected error occurred';
    });
  }
That should set our post and page endpoints, bringing back data from the API. Make sure that TheLoop is in your Archive and Single components.
And if all is good, we should have something like below:
Remember that we have to change our permalinks in WordPress to match our route.
Add Paging
Paging is necessary especially for archive pages. You only want to see the latest X number of posts, then show the next X – and so on.
In Archive.js – simply add the pager component (that we still have to build), right underneath the loop:
 <TheLoop></TheLoop>
 <Pager></Pager>
Now let’s create a file in our partials folder – call it Pager.js.
import React, { useEffect } from 'react';
import WithConsumer from '../context/WithConsumer';
const Pager = function ({context}){
    let prevBtn =  React.createRef();
    let nextBtn =  React.createRef();
    let curPage = () => context.currentPage;
    let totalPages = () => context.totalPages;
    useEffect(() => {
        prevBtn.current.disabled = true;
        // eslint-disable-next-line react-hooks/exhaustive-deps
    },[]);
    function nextClicked(){
        context.nextClicked();
        if(parseInt(totalPages()) === parseInt(curPage() + 1) ){
            nextBtn.current.disabled = true;
        }
        prevBtn.current.disabled = false;
    }
    function previousClicked(){
        context.previousClicked();
        if(parseInt(curPage()-1) === 1 ){
            prevBtn.current.disabled = true;
        }
        nextBtn.current.disabled = false;
    }
    function pagerClass(){
        let cls = 'Pager';
        if(parseInt(totalPages()) <=1 ||
            context.appError){
            cls = 'Pager hidden';
        }
        return cls;
    }
    return (
        <div className={pagerClass()}>
        <button ref={prevBtn} onClick={previousClicked}>Previous</button>
        <button ref={nextBtn} onClick={nextClicked}>Next</button>
        <div className="PagerText">Page
            <span dangerouslySetInnerHTML={{__html: curPage()}}></span> of
            <span dangerouslySetInnerHTML={{__html: totalPages()}}></span></div>
        </div>
    )
}
export default WithConsumer(Pager);
Now the pager logic is a little more involved. Above simply outputs our “Next” and “Previous” buttons – depending on the number of pages. Fortunately, WordPress’s API makes this easy for us. We have 2 important header properties from each response called ” X-WP-Total” and ” X-WP-TotalPages”. From this we can determine the logic needed for our paging.
Going back to context, we need to modify our state, add some methods that modify that state, as well as modify our rest calls.
//ADD THIS TO this.state IN THE CONSTRUCTOR
currentPage : 1,
totalPages : 0,
nextClicked : this.nextClicked.bind(this),
previousClicked : this.previousClicked.bind(this),
Above shows our new state. Note that currentPage always starts at 1. Totalpages – we update on every call, then we bind 2 methods to “this”.
Next, let’s add modify our buildUrl() method to have the page parameters from our state.
 case 'post':
      default:
        url += this.state.slug ? 'posts/?slug=' + this.state.slug : 'posts/?page=' + this.state.currentPage;
        break;
Above simply appends the current page to the url endpoint. In our getPosts() method, we update our totalPages in state with each response:
Axios.get(url).then((response)=>{
      self.setState({
        posts : response.data,
        totalPages : response.headers['x-wp-totalpages']
      }
Now all we need to do is create two functions – which correspond to which button was clicked:
  nextClicked (){
    let newPage = this.state.currentPage + 1;
    this.setState({
      currentPage : newPage
    },function(){
      this.getPosts(this.buildUrl());
    })
  }
  previousClicked (){
    let newPage = this.state.currentPage - 1;
    this.setState({
      currentPage : newPage
    },function(){
      this.getPosts(this.buildUrl());
    })
  }
Both of these methods are called from our Pager component – which we access by doing context.XXXClicked(). Pretty neat right?
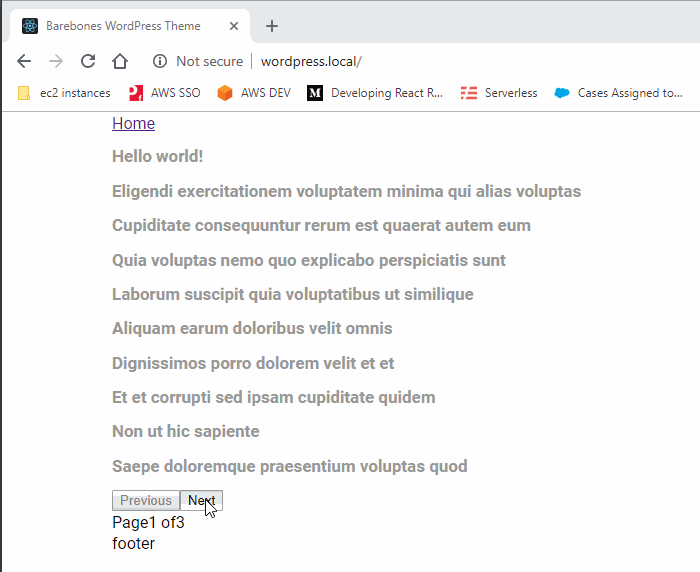
We also let the front end decide whether to show or hide the respective buttons. So if all goes well, we have something like below:
Okay that should be it for this round. A lot going on above. I suggest you download the code and run it yourself – along with following the steps. Note there are a lot of omitted code above. Only the important steps are outlined – the rest is up to you.


Thanks a lot to sharing knowledge!.
since the react client side rendering, do you have idea about handle the SEO on this situation.
I’ve the same MO question, any way to transform this in an SSR to use the fast of loading without break the SEO?
same to need me, if have please give us code
great tutorial and easy to understand and implements
I have some errors and need some functions. For example pos.length get error
Hi Michael,
Thanks for the post. I am wondering how React based themes work with WordPress plugins, I am aware you can pull from the generic WordPress API’s to grab posts and what-not, but what about a random calendar plugin for example, or anything for that matter. How does react deal with these?
Thanks
Your tutorial saves my days but…
In Context.js line there is no function called getRestType()
This is exactly where I got stuck 🙁
What are the changes to permalinks in WordPress to match our route?
Unfortunately this tutorial seems broken at the moment – in Context.js the function:
let restType = this.getRestType(props.router.match.path);
getRestType is undefined!
Be great to be able to get past this! Hope you can update us 🙂