Lately, I’ve been using React for building applications for work. React is a library that takes care of the “views” of your application. It is scalable, fast and very powerful. What I especially like about React is the way it handles the DOM – through something called the “Virtual DOM“.
Rendering components through the Virtual DOM makes you think about writing your application a whole different way. But that’s an entirely different discussion. One that I might make a post about someday – but first I want to describe how to loop through multiple nested components in React:
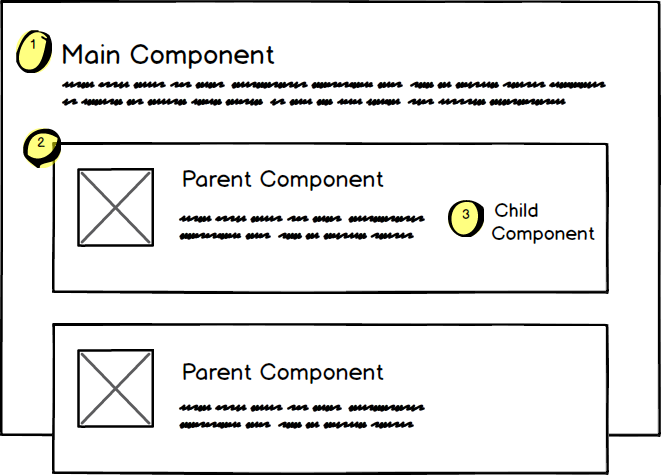
So the app is pretty straight forward, I grab some JSON data from an AJAX call, and display it in the page. The page involves multiple sections – some nested in each other. An example section is shown below:

By using React we will need to think of these sections as “components” as I’ve annotated in the screenshot above. Note the parent – child components in the application.
The Main Component
Let’s start with the main component that wraps the whole application inside of it. In React, all you need is a “render” method, inside of a “class”. This render method is in charge of outputting this “component” in the DOM:
var MyData = React.createClass({
 render : function(){
      return (
code above was cut short – due to problems with my sytnax highlighter plugin
As you can see above, I have two child components: “MyDataIntro ” and “MyDataResults”.
Real quick: the “attributes” of the component is actually “this.props” – which is an object in React components by default. The values for the props are passed on over by “this.state” – which is also an object in React by default. The difference is one is mutable and the other is immutable. Let’s get into this conversation another time as well.
Okay, so now we have our main component, with child components. “MyDataIntro” is good since it doesn’t have any children. “MyDataResults” however, has kids – passed on over through “this.state.sections”.
Note that “this.state.sections” is a JavaScript object that looks something like:
sections : {
   parentName : {
    property : value,
    property : value,
    childrenName : {
      property : value,
      property : value,
    }
   }
}
So you see that we have to go through each section and output it’s contents – according to the object above. Next, let’s look at our “MyDataResults”:
The Sections and child Components
“MyDataResults” will look something like below. Note that inside the “render” method is a lot of activity. First, I’m accessing the properties from the parent through “this.props”. Then we make a local array, so we can stuff the contents of “this.props” inside of it.
Note that this “output” array is built using the “.map()” method which makes it possible to run a function on each element of our original array. In our case, we’re simply returning an HTML block – with values in it.
var MyDataResults = React.createClass({
  render : function(){
    var sections = this.props.sections;
    var output = [];
    var output = Object.keys(sections).map(function (key){
        return (
code above was cut short – due to problems with my sytnax highlighter plugin
I want you to notice one thing inside our “section” though – it’s another component! We have “MyDataResultsChildren” component stuffed inside our output HTML, with this.props called children – and we’re passing some content of our original JavaScript object “sections”.
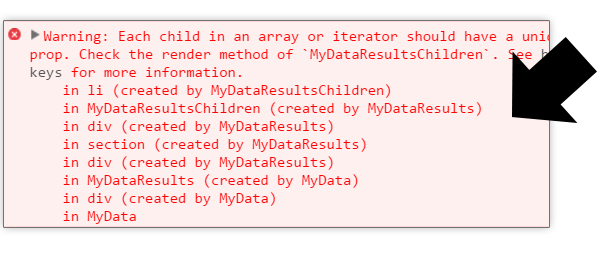
Another thing that you can’t miss is the “key” property that we’re assigning to each “section”. So React needs a way to identify each of the child in the array we’re outputting. In our case each “section” inside our HTML. You will get a warning that looks like below:

The solution is to simply pass a unique identifier for each item in the array. An iterator or an ID – simply assign it to a “key” attribute.
The return statement of our “render()” function simply spits out the wrapping “DIV”, with our “{output}” inside it. Let’s look at our child component: “MyDataResultsChildren”.
var MyDataResultsChildren = React.createClass({
  render : function(){
      var children = this.props.children;
      var output = children.map(function(child){
          return (
code above was cut short – due to problems with my sytnax highlighter plugin
So our “MyDataResultsChildren” component is a simple one. Again, we’re accessing the contents through “this.props”, while we’re using “.map()” to build the HTML – before passing it to the main return function of the “render()” method.
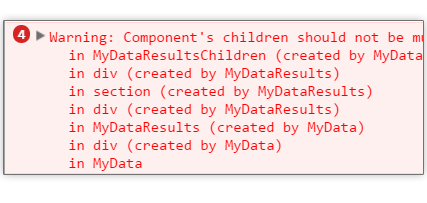
So another thing to watch out for: manipulating React data – such as doing an in-place sort, will cause a “Component’s children should not be mutated.” warning:

The solution is to manipulate the data before handing it over to React. In my case, I had to do the .sort on the array – before assigning to this.props.
More React?
So I’ve just shown you how to do multiple nested components in React. This is as simple as it gets and I hope to write some more as I dive deeper into this awesome library. For more information with React other than their docs, visit this guy: Mindspace and watch his videos in React – it’s really well written. I also really like is this one: React.js Introduction, for People who use jQuery. This will show you the differences between building apps the jQuery way vs the React way.
Leave your comments below on questions or remarks you may have.

