In the previous post, we’ve completed setting up the frame for our shopping cart website. We’ve added the routes, finished the product listing page, added filters – and we’ve even started an empty shell for the cart component.
Note that if you want to simply download the code – head on to Github. If you’d like to see the working demo, click the button below.
Otherwise, let’s continue from where we left off:
Display a single Product
So when clicking a product – all we get is a blank screen with the slug. Open the file Product.jsx and start by creating our signals.
import { useParams } from "solid-app-router"
import { productList } from '../data/productList';

export default function Product(){
    const ALLPRODUCTS = productList.slice();
    const [ product, setProduct ] = createSignal({});
    const params = useParams();

    ...
}
First we’re importing our static list and creating a constant for us to use. We’re also creating a signal called product – which will hold the current focused product – depending on the slug from the url.
Let’s add an onMount() to show a single product.
 onMount(()=>{
        let productArr = ALLPRODUCTS.filter((item)=>{
            return item.slug === params.slug;
        })
        if(productArr.length === 0){
            alert('HANDLE ERROR');
        }else{
            setProduct(productArr[0])
        }
 })
All this does is setting up a single product on mount. We’re just alerting an error when a product is not found – we can improve this later.
We’re also going to add some options before adding items to the cart. This will be the “quantity” and the “size” of the product.
Still in Product.jsx – I’m just going to show the important parts below. I will omit the bootstrap HTML to save space.
import { createSignal, For, onMount } from "solid-js";
import { Button, Card, Col, Container, Form, FormLabel, Row } from "solid-bootstrap";

export default function Product(){
  ...
  const [ selectedSize, setSelectedSize ] = createSignal('');
  const [ quantity, setQuantity ] = createSignal(1);
  const [ btnDisabled, setBtnDisabled ] = createSignal(true);
  ...
  return (
        <Container class="mb-5 mt-5 row inner-wrap">
           ...
            <Form.Select name="size" value={selectedSize()} onChange={changeHandler}>
                 <For each={product().sizes}>
                   {size=><option value={size}>{size}</option>}
                 </For>
                 </Form.Select>
           ...
            <Form.Select name="quantity" value={quantity()} onChange={changeHandler}>
           ...
           </Form.Select>
           ...
           <Button disabled={btnDisabled()} value={product().id} onclick={addToCart}>Add to Cart</Button>
        </Container>
    )
So we’re adding more signals – for the two input fields that we need – which is the size and quantity. And since both are required fields, we’re setting the Button to disabled first, then when both values are not empty – we enable it. We do this by adding a “createEffect()”:
...
createEffect(()=>{
        if(selectedSize() !== '' && quantity() !== ''){
            setBtnDisabled(false);
        }else{
            setBtnDisabled(true);
        }
})
Now take a look at our button and try changing the inputs:
Adding to Cart
Let’s move on the addToCart() logic. Now adding is pretty straightforward – but let’s remember, you don’t want to keep pushing to the cart items array – because what if the item is already in there? In that case you want to just update it.
function addToCart(){
        let productToAdd ={
             ...product(),
            size : selectedSize(),
            quantity : quantity()

        };
        let items = cartItems.slice();
        let foundIndex, found;
        found = items.filter((item,ind)=>{
            if(item.id === productToAdd.id
                && item.size === productToAdd.size){
                    foundIndex = ind;
                    return item
                }
        })

        let msg = '';
        if(found.length > 0){
            msg = 'Item updated in cart';
            let productToUpdate = {
                ...found[0],
                quantity : productToAdd.quantity,
                subtotal : productToAdd.quantity * productToAdd.price
            }
            items.splice(foundIndex, 1, productToUpdate);
        }else{
            msg = 'Item added to cart';
            productToAdd.size = selectedSize();
            productToAdd.quantity = parseInt(quantity());
            productToAdd.subtotal = productToAdd.quantity * productToAdd.price;
            items.push(productToAdd);
        }
        setCartItems(items);
        setToastMessage(msg);
}
A quick run down of what’s going on above, we’re simply rebuilding the cartItems array (which is a central store), so we can display it in our cart. As mentioned, we’re trying to see if an item is already in the cart “productToUpdate” by checking if its the same product and size. If it is, we’re simply updating the quantity and subtotal. If it’s not existing “productToAdd“, then we simply push to the array.
We’re also setting a toast message to display a small notification after they update the cart.
Really quick – let’s add a small bubble to the “Cart” link in our header. Remember how “cartItems” is accessible in all of our components?
import { setShowCart, cartItems } from '../App';
...
<Nav.Link class="cart-link" onClick={setShowCart(true)}>Cart
                    { cartItems.length > 0
                    ? <span class="cart-item-indicator">{cartItems.length}</span>
                    : null }</Nav.Link>
So above is a simple span tag that shows up if there’s items in our cart. Note that I’ve stuffed the CSS in index.html for simplicity – just grab it from the repo.
Let’s see how it looks so far:

Let’s now move on to our Cart component and display our items.
Display Cart Items
Remember in Part 1 – we’ve created an “OffCanvas” component called “Cart“? Let’s add some code to it that will show us our cart items. First, let’s import cartItems and let’s create a signal for the total. We’re also going to create an effect – so that every time cartItems change, our total reacts with it.
import { createEffect, createSignal, For } from "solid-js";
import { cartItems } from "./App";
...
const [total, setTotal ] = createSignal(0);
...

export default function Cart(){
    createEffect(()=>{
        let ttl = 0;
        cartItems.forEach((item)=>{
            ttl = ttl+item.subtotal;
        })
        setTotal(ttl);
    })
}
The HTML simply loops through our cartItems and shows the details of each cart item:
<For each={cartItems}>
            {(product)=>{
                return (
                    <Row class="mb-4">
                        <Col xs="3">
                            <Image src={product.image} class='thumbnail' />
                        </Col>
                        <Col xs="9" class="cart-item-text">
                            <h6>{product.name}</h6>
                            <p><span>{product.size}</span></p>
                            <p class="price-row">
                                <span>${product.price.toFixed(2)} (x{product.quantity})</span>
                                <span>${product.subtotal.toFixed(2)}</span>
                            </p>
                        </Col>
                    </Row>
                )
            }}
        </For>
Note that there are optimal ways to handle the calculation of the totals. For instance, we’re simply doing a “toFixed()” – to make the display of the totals better. But in reality, you’d want to calculate decimals etc. Again, we’re keeping it simple for now.
Let’s see how our cart looks.
Edit / Remove Cart Items
Finally, let’s look at the cart experience. You’d want to let your users edit the cart items directly. Most likely, the ability to adjust the quantity of an item – and of course, remove it entirely.
In our CartItems component, let’s add the buttons in the HTML.
<button  value={ind()} onClick={evt=>removeItem(evt)}>x</button>
...
<span>
    <button value={ind()} onClick={evt=>updateQuantity(evt,'add')}>+</button>
      {product.quantity}
    <button value={ind()} onClick={evt=>updateQuantity(evt,null)}>-</button>
</span>
Notice the two handlers that we’ve attached the buttons with (updateQuantity and removeItem) – we’ll get to that in a bit.
Let’s add a bit of styling to our newly added buttons.
 .cart-item-text button {
        border: 1px solid #ccc;
        color: #0a0909;
        border-radius: 4px;
        margin-left: 5px;
        margin-right: 5px;
        font-size: 12px;
        height: 16px;
        line-height: 9px;
        padding-bottom: 2px;
}
Taking a quick look at how our buttons look – I say its not too shabby eh?
Now clicking on each button doesn’t do anything yet. Let’s fix that.
Let’s start by creating the updateQuantity() function:
function updateQuantity(evt,method){
     evt.preventDefault();
     const index = parseInt(evt.target.value);
     let temp = cartItems.map((item,i)=>{
         if(index === i){
             if(item.quantity === 1 && !method){
                 return {...item};
             }
             const qty = method === 'add' ? item.quantity + 1 : item.quantity - 1;
             const subtotal = item.price * qty;
             return {
                 ...item,
                 quantity : qty,
                 subtotal : subtotal
             }
         }else{
             return {...item};
         }
     })
     setCartItems(temp);
}
Going through the code above, first – we prevent default to stop the default behavior of the button. Then we grab the index of the clicked item, so we know which item in the cartItems array will be updated.
Now we do everything inside a map() function. We’re basically checking if its the right index, otherwise, we simply return the item. If it is the right index – we do our calculation. Depending if the operation is a “sum” – we increment, or decrement if its not.
Finally, let’s build the removeItem() function:
function removeItem(evt){
     evt.preventDefault();
     const index = parseInt(evt.target.value);
     let items = [...cartItems];
     items.splice(index,1)
     setCartItems(items);
 }
This function is pretty simple. We just do a splice – for the clicked index to remove it from the array.
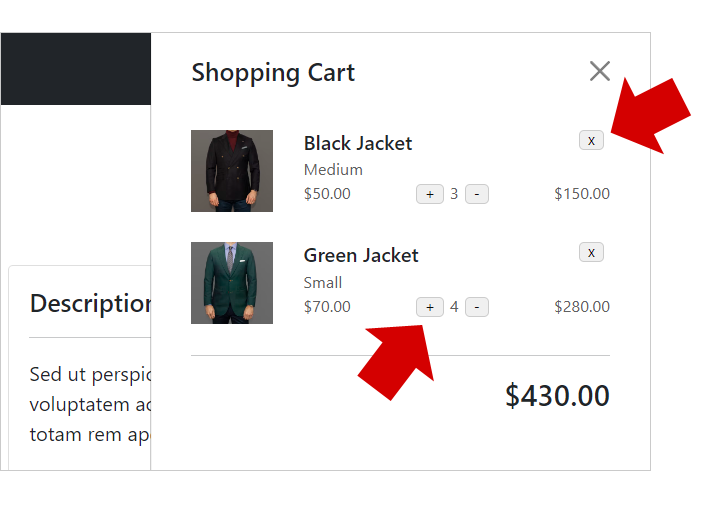
Below shows how our newly created buttons behave:
You can see, everything is reacting to our updates accordingly. Not only the quantity, as well as the subtotals and the total.
Conclusion
There you have it. A simple Shopping Cart application built on SolidJS and Bootstrap. Hopefully by going through this tutorial, you can truly see how SolidJS’s reactivity works.
So what’s the verdict? Is SolidJS better than React?
I think it is.
It is definitely a lot cleaner and much more intuitive to write. I am glad that they kept the good parts of React, and addressed the most annoying parts. I hope to see a lot more SolidJS in the future.
What’s your experience with Solid? Leave your comments below.

First, thank you for sharing your work.
Can you tell me why the shopping cart does not disappear when you click somewhere? is backdrop = true not the default?
Hi Vince. I see the backdrop div in the source, but I’m not sure why its not showing in the code. I might have some CSS in there that’s preventing it from being clicked. Might need to do some digging.