I’ve been building Salesforce applications for some time now and we’re always faced with the same struggle when in comes to CICD. See, we write code locally in our machines. Then we use SFDX to push to our sandboxes – this is so we can see the changes, as well as other users test what we’ve built. We commit to Git for storing our code, branch and merge changes. With VSCode, and extensions – this is working fine and as intended.
TL;DR – if you want to just get to the solution, simply click button above.
The Struggle
The problem lies when we want to deploy our code to the upper environments like UAT and Production. We use a tool called Copado, which takes the code from a designated Sandbox and deploys it. It doesn’t take it from the repository where we originally store our code.
So the developers would have to go to the Copado UI – “re-select” the files that have been modified, choose the Test(s) to run – validate, get it approved and then it pushes it to the orgs. It’s a very slow process. In addition, when one thing fails, you get to start all over again.
This design aims to solve all of that. Note that this solution is based on Pablo Gonazales’ solution – with a few tweaks of my own. I’ve also simplified the model greatly – as you’ll see below.
Modular Repos, 2 Branches
This model is designed for repositories that are “Project” based. So each repository ONLY has the components needed for the application to work. We are NOT deploying all metadata inside an org. It is designed to be small, modular and deployable.
You can trim down your project by selecting only your application’s files – by updating your package.xml in your local SFDX project. I recommend using this extension for VSCode.
In addition, we only really have 2 branches: 1) The “feature branch” – which is the bug fix or the feature the developer is currently working on, and 2) master – which is where all the changes are merged into.
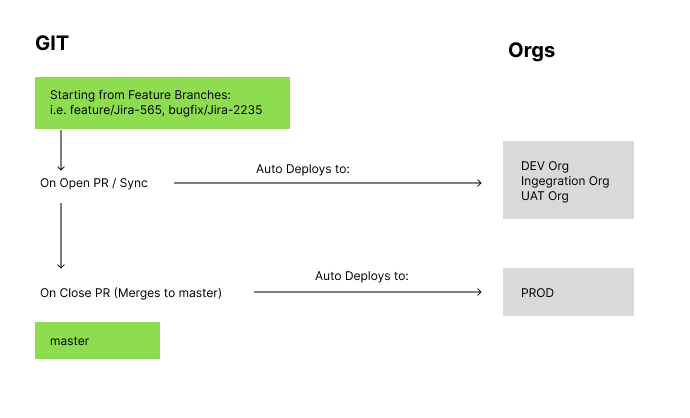
So this is a way simplified version – compared to Pablo’s original solution. The steps for the workflow is as follows:
- Create a Feature branch from Master – every time a bug or a feature is added, a developer copies master and works on their own branch. All commits / pushes to this branch stays here (and their personal org) – which they deploy to using SFDX
- When changes are good – they open a Pull Request to master. This deploys to the orgs (including UAT)
- When everything is tested – PR is closed (merged to master). This deploys the code to production
Again, this is a simplified version. For a more robust workflow – I suggest using Pablo’s design.
GitHub Actions is the glue
As mentioned above, when we code locally – we continuously deploy to our sandboxes all day. This is made possible by SFDX. Now, how do we tie this process in with CICD? That’s where GitHub Actions come in.
It’s basically the thing that ties the two together.
name: Deploy to Production
on:
    pull_request:
      branches: [ master ]
      types:
        - closed
      paths:
        - 'force-app/**'

jobs:
    push-to-prod:
        runs-on: ubuntu-latest
            - name: 'Put changed files into a dir'
              run: |
                  mkdir changed-sources
                  sfdx sgd:source:delta --to "HEAD" --from "HEAD^" ...
            - name: 'Deploying to production'
              run: sfdx force:source:deploy -p "changed-sources/force-app" ...
...
As you can see from the sample code above, we’re running SFDX inside Github – as if it was running in our local machine. In addition, we can run npm, node and bash – for things like file manipulation etc.
Features
Only deploy the changed files. Just like in Pablo’s solution – we’re only deploying files that have been changed from master. This keeps the deployment small and fast.
We have the ability to select test classes, or if we leave the default “all” – it will automatically detect test classes in your repo and run them. This logic is inside a file called “parseTests.js” which just looks at all Apex classes that ends with “Test”.
Code Scanning – this part has been commented out in the push-to-orgs.yml – but I strongly suggest using it. This scans the code for best practices and vulnerabilities.
All interactions are done in the repo. No need to use external tools like Jenkins or Copado. We’re using Pull Requests as the basis of whether it gets deployed to the orgs and production.
Git is the source of truth. Unlike Copado – this solution keeps the truth in the Git repo.
How to Use
The repo contains a sample SFDX project. Simply clone and open in VSCode to edit. You will notice a package.xml file – which dictates the files that’s part of the project.
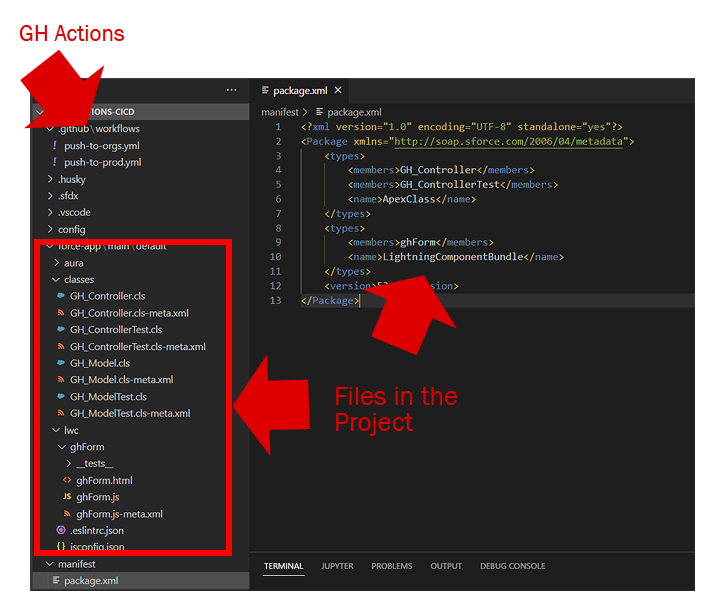
Also inside the .github/worfklows folder are 2 files: push-to-orgs.yml and push-to-prod.yml. These are the actions. This is how we tell GitHub what to do when specific actions are triggered. In our case, its when pull requests are opened, synchronized and closed on the master branch.
You’re going to deploy to 3 orgs in total. So you’ll need to create 3 Action Secrets inside your repo settings.
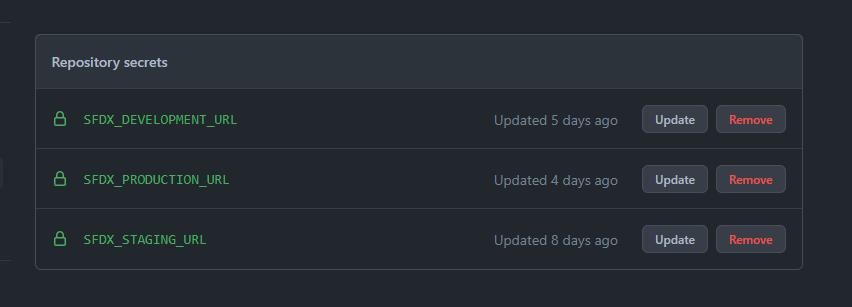
These correspond to the orgs that you want to deploy to. To create the auth url run the command below:
sfdx force:org:display -u <ORGUSERNAME> --verbose --json > auth.jsonThis will produce a file called auth.json. Inside it is the URL that you need to plug in the repository secrets. You have to do this per org that you want to deploy to.
Once all of the setup is complete, simply create a branch from master and check it out. Open an Apex Class and edit. Stage the file, commit and push.
Now – open a Pull Request. This will trigger the job push-to-orgs.yml.
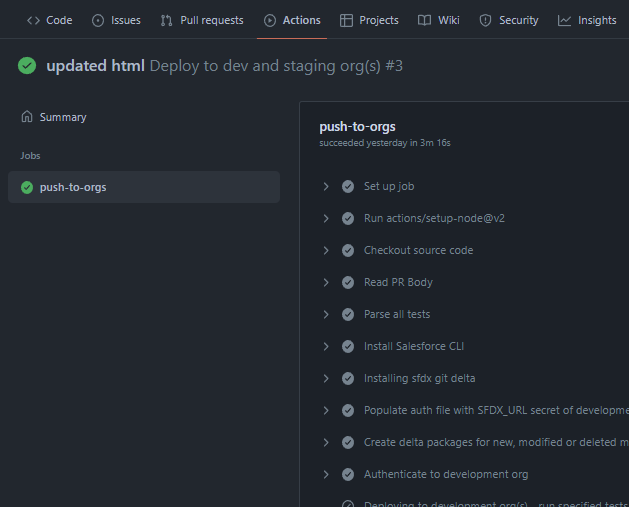
Note that you don’t have to select any files, or test classes (although that option is available).
Also, any changes to the existing feature branch will trigger this job. Basically as long as the Pull Request hasn’t been closed – you are able to sync your changes as well as deploy automatically.
Once all is good – you can simply close the PR and it will run push-to-prod.yml – which just pushes it to your production org.