So it’s been a while since I’ve posted a tutorial. I have been stagnant for a while, just using the same technologies for work and personal projects. Although recently, one framework caught my eye – SolidJS. It claims to have “true” reactivity and addresses many of the things I don’t like about React (such as too much unnecessary re-renders).

Now don’t get me wrong – I like React. I think functional components, JSX, hooks – are all good things. But there are a few quirks that I wish was different.
I recommend going through Solid’s website and finding out for yourself. I’ve also decided to use Bootstrap for the CSS framework because its what’s available. Note that there are hardly any pre-built CSS components available for Solid at time of writing. I do hope this will change in time – because I honestly like Solid so far.
So let’s give this a go. We’re building a shopping cart website. One with a product listing page, complete with filters. We’ll add a single product page and a global store where the cart lives. And finally, we’ll add routes so we can access parts of the application through a bookmarkable url.
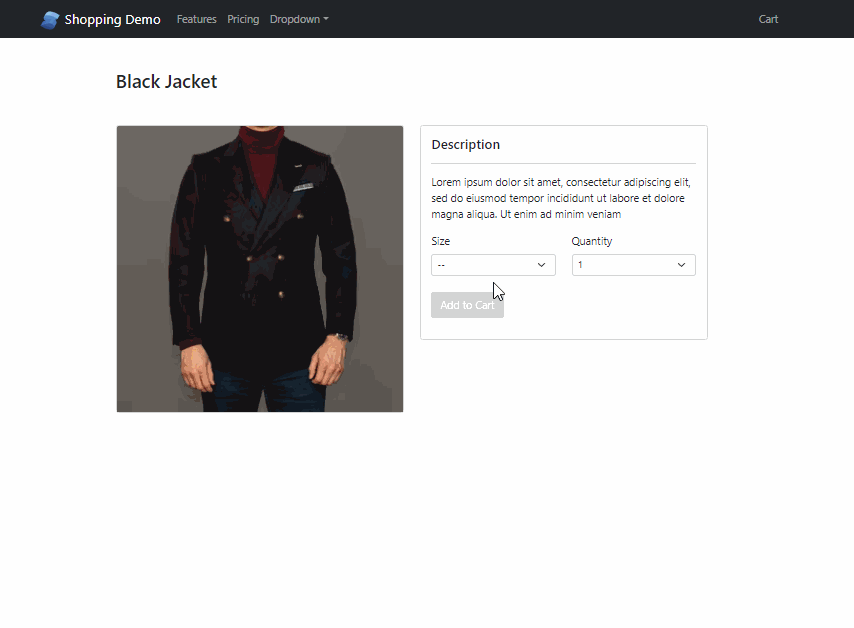
Here’s a quick preview of what we’re building:
Ready to start? Let’s begin.
Setting things up
Note that I will skip the installation parts – simply clone and run npm install. The Github repository found here. You can also checkout the demo which can be accessed through this link.
Let’s start with the routes. We’re going to keep things simple – with just 2 routes: Products and Product. The products (which is also the homepage) simply lists all the products we have, and the Product – will show the product detail when clicked.
In index.jsx, let’s wrap our App inside a Router component:
import { render } from 'solid-js/web';
import { Router } from 'solid-app-router';
import App from './App';

render(
    () =>
        ( <Router>
         <App />
       </Router> ), document.getElementById('root'));
Now let’s move on to App.jsx. Let’s add the two routes that we talked about:
import { lazy } from "solid-js";
import { Routes,Route } from 'solid-app-router';
import { Container } from "solid-bootstrap";

const Product = lazy(() => import("./routes/Product"));
const Products = lazy(() => import("./routes/Products"));

function App() {
  return (
    <Container class="pb-5">
      <Routes>
        <Route path='/' element={<Products />}   />
        <Route path="/:slug" element={<Product />} />
      </Routes>
    </Container>
  );
}
export default App;
Let’s also go ahead and create a folder called “routes” and add two components inside it. Name them Products.jsx and Product.jsx
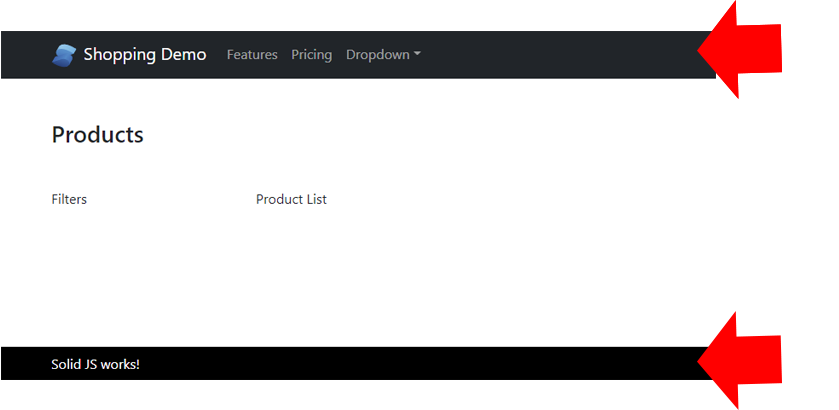
//this is Products.jsx:
export default function Products(){
return (
<div class="products-page mb-5 mt-5 row">
<h3 class="mb-5">Products</h3>
<div class="col-md-3">
Filters
</div>
<div class="col-md-9 d-flex flex-wrap gap-4">
Product List
</div>
</div>
)
}
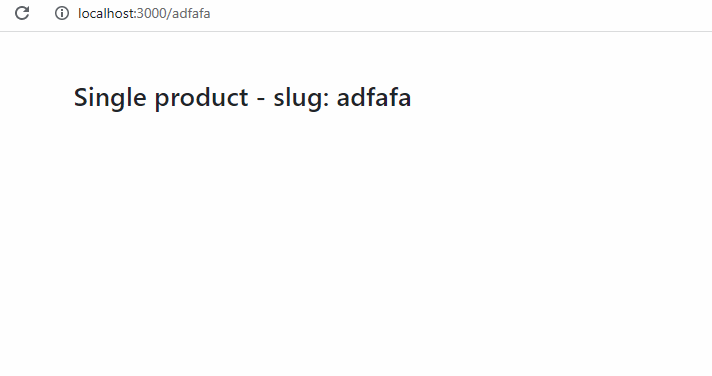
//this is Product.jsx:
import { useParams } from "solid-app-router"
import { Container } from "solid-bootstrap";
export default function Product(){
const params = useParams();
return (
<Container class="inner-wrap mb-5 mt-5 row">
<h3 class="mb-5">Single product - slug: {params.slug}</h3>
</Container>
)
}Not a lot going on here, but we’ve setup our website with the minimum routes necessary. Let’s see what we have so far:
Let’s also add a header and footer – to make our website look nicer. Note that the header and footer code are all boilerplate code from Bootstrap – so don’t pay too much attention to them. Just keep note of the “Cart” button in the header – we’ll use this to hide/show our cart.
//this is Header.jsx
import logo from '../logo.svg';
import { Link } from 'solid-app-router';
import { Navbar, NavDropdown, Nav, Container } from 'solid-bootstrap';

function Header(){
    return (
        <Navbar collapseOnSelect expand="lg" bg="dark" variant="dark">
            <Container>
            <Navbar.Brand>
            <Link href='/' class="no-underline color-white">
                <img class="me-2" src={logo} width="30" height="28" alt="logo" />
                Shopping Demo
            </Link>
            </Navbar.Brand>
            <Navbar.Toggle aria-controls="responsive-navbar-nav" />
            <Navbar.Collapse id="responsive-navbar-nav">
                <Nav>
                <Nav.Link>Cart</Nav.Link>
                </Nav>
            </Navbar.Collapse>
            </Container>
        </Navbar>
    )
}
export default Header;

//this is footer
import { Container } from "solid-bootstrap";

export default function Footer(){
    return (
        <footer>
            <Container>Solid JS works!</Container>
        </footer>
    );
}
Now things are starting to shape up.
Now that our website frame is in place, we can start filling it up with some data and add some structure.
Add the Products
For our demo purposes, we’re just going to add static data to populate our products. You will probably add yours from an API of some sort. For now, add a static file called productList.js – with an array of objects like so:
[
 {
        id: 'prod_LbfpnuB1dc81pW',
        description : 'Lorem ipsum dolor sit amet...',
        name: 'Black Jacket',
        price: 50,
        currency: 'USD',
        image: 'https://images.unsplash.com...',
        slug : 'black-jacket',
        category : ['Formal','Casual']
    },
    ...
]
Now back in App.jsx let’s create a store for our products and add the product list above:
import { productList } from "./data/productList";

...

export const [products,setProducts] = createStore(productList);
We’ve added this to App.jsx and exported it – so we can use our products globally. You can choose to add this store into a separate file – but for the sake of simplicity, I just added it here.
Now let’s display the products in our HTML.
import { For } from "solid-js";
import { products } from "../App";
import { useNavigate } from "solid-app-router";
import { Button, Card, Col } from "solid-bootstrap";

function ProductTile({product}){
    const navigate = useNavigate();
    return (
         <Col class="col-md-3">
            <Card>
            <Card.Img variant="top" src={product.image} />
            <Card.Body>
                <Card.Title>{product.name}</Card.Title>
                <Card.Text class="lt-clamp-3">
                    {product.description}
                </Card.Text>
                <Button variant="primary" onclick={()=>{navigate(`/${product.slug}/`)}}>Details</Button>
            </Card.Body>
            </Card>
         </Col>
    )
}

export default function Products(){
    return (
        <div class="products-page mb-5 mt-5 row">
        <h3 class="mb-5">Products</h3>
        <div class="col-md-3">
            Filters
        </div>
        <div class="col-md-9 d-flex flex-wrap gap-4">
        <For each={products}>
            {product => <ProductTile product={product} /> }
        </For>
        </div>
        </div>
    )
}
A few things to note in the code above. Notice the “For” component. This is specific to how Solid does it’s for loops in JSX. Although you can still use a .map() – but I thing having this is much cleaner.
Now try clicking the “details” and it should route to our single page.
Add Product Filters
Let’s add a simple filter mechanism for our products. If you notice in our fake data, each product has a category node – which is an array of categories. From this we can build our filters.
Let’s create another component called Filters.jsx. In it, add the following code:
import { createSignal, onMount } from "solid-js";
import { productList } from "../data/productList";
export default function Filters(){

    const ALLPRODUCTS = productList.slice(); //making copy so doesnt mutate
    const [filters,setFilters] = createSignal([]);

    return (
        <For each={filters()}>
        {(filter)=>{
            return (
                <div class="form-check">
                <input class="form-check-input"
                    type="checkbox"
                    value={filter.name}
                    id={filter.name}
                    checked={filter.checked}
                     />
                <label class="form-check-label" for={filter.name}>
                    {filter.name}
                </label>
                </div>
            )
        }}
        </For>
    )
}
Okay so a few things going on in this file. First, notice that we’re bringing in the static list of products – we’re assigning it to a constant “ALLPRODUCTS” for later use. Also, note the signal we’ve created by using createSignal(). This is basically equivalent to React’s useState(). This is how things become reactive.
Notice that we have 2 contsants, “filters” and “setFilters” – which is basically a getter and a setter. We’re setting it to an empty array for now.
Add an onMount() function – to build our filters and set it using our setter.
 onMount(()=>{
        let filterList = [];
        ALLPRODUCTS.forEach((product)=>{
            product.category.forEach((cat)=>{
                let found = filterList.some(function(el) {
                    return el.name === cat;
                });
                if(!found){
                    filterList.push({name:cat,checked:false});
                }
            })
        })
        setFilters(filterList);
    })
I really like Solid’s onMount() lifecycle hook – which is equivalent to React’s useEffect() with no dependencies. So it basically just runs once (on mount) – and it really only runs once (not like useEffect()). So inside this hook, we’re looping through the product categories and creating a unique array of objects out of it.
Each object is looped through our JSX – building our checkboxes like below:
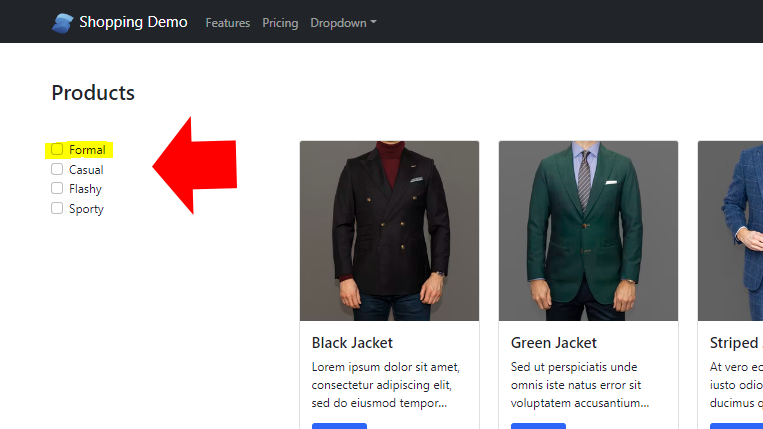
Of course, nothing happens yet when you click it – that’s because we haven’t written the handler for it yet.
Add the following code for our click handler:
function filterChangeHandler(evt){
        setFilters(
            filters().map((item)=>{
                return item.name === evt.target.value ? {...item,checked : evt.target.checked} : {...item};
            })
        );
        return false;
 }

...

//on the checkbox input add this:
onChange={filterChangeHandler}
//it should look like this:
<input class="form-check-input"
                    type="checkbox"
                    value={filter.name}
                    id={filter.name}
                    checked={filter.checked}
                    onChange={filterChangeHandler} />
Now upon clicking – it really doesn’t do anything yet, it just updates our “filters” array to mark which categories are “checked”. So if you console log our filters array – it should look like below:
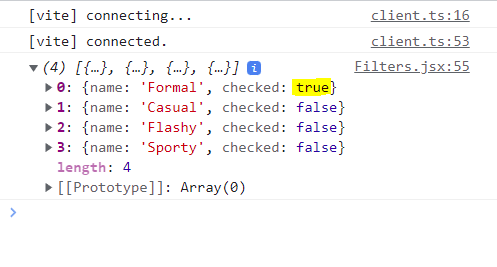
Our filters array are now being updated – with the checkboxes that we’ve clicked. Now let’s update the DOM with the information we have. We do that by using “createEffect()“.
//add another import:
import { setProducts } from "../App";

//add this to the component:
createEffect(() => {
        let filterArr = [];
        filters().forEach((item)=>{
            if(item.checked){
                filterArr.push(item.name);
            }
        })

        if(filterArr.length === 0){
            setProducts(ALLPRODUCTS);
        }else{
            let filteredProducts = ALLPRODUCTS.filter((item)=>{
                let found = item.category.some((cat)=>{
                    return filterArr.includes(cat);
                });
                if(found){
                    return item;
                }
            })
            setProducts(filteredProducts);
        }

    });
So effects are what’s know as “observers” in Solid. We use createEffect() – to track changes in our signals. Again, its the same as useEffect in React – but with a few notable differences. One in particular is not having to list the dependencies – which is quite annoying. Solid’s createEffect – simply knows what signals to observe.
So in our example, we’re really tracking changes in our filters array. It changes on mount, and every time we click the checkboxes.
So every time they change – we “react” by changing the listed products.
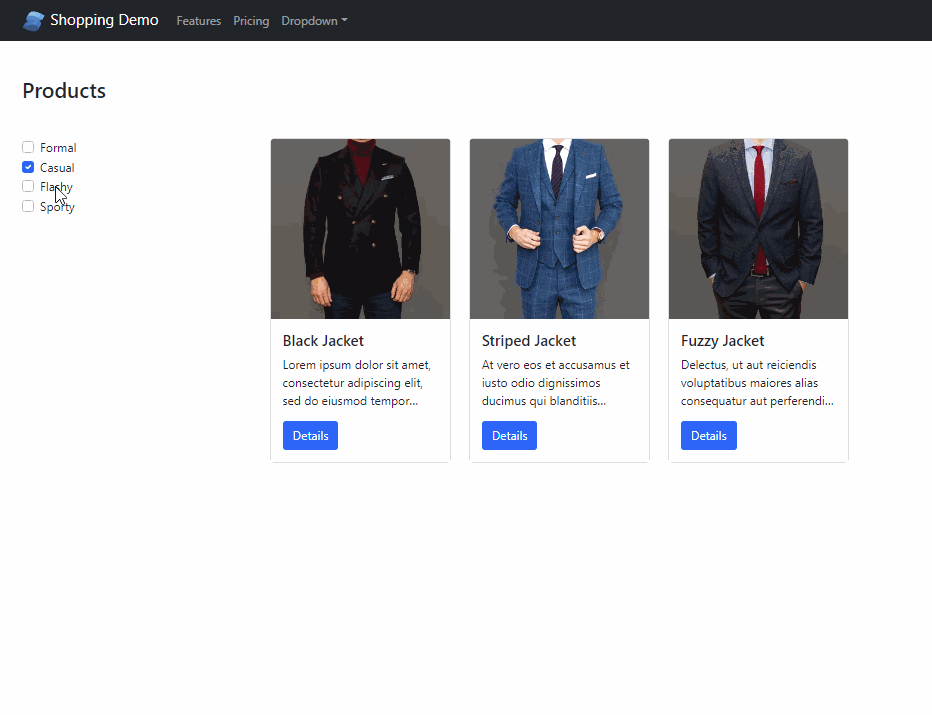
As you can see, our products are really starting to shape up. We can of course do a little more by adding a search and paging – but let’s keep it simple for now.
Add the Cart Component
Let’s wrap it up by adding a Cart component. It won’t contain logic yet, but more of a placeholder for the contents of our shopping cart. Create a Cart.jsx component and simply add the HTML below:
import { Offcanvas } from "solid-bootstrap";
import { showCart, setShowCart } from "./App";
export default function Cart(){
return (
<>
<Offcanvas
show={showCart()}
onHide={()=>{setShowCart(false)}}
placement={'end'}>
<Offcanvas.Header closeButton>
<Offcanvas.Title>Shopping Cart</Offcanvas.Title>
</Offcanvas.Header>
<Offcanvas.Body>
Some text as placeholder.
</Offcanvas.Body>
</Offcanvas>
</>
)
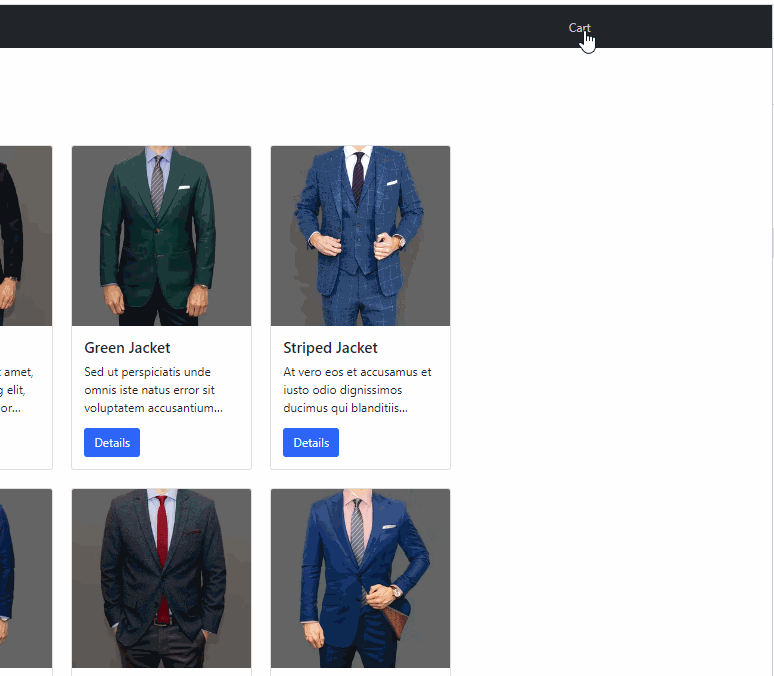
}We’re using “Offcanvas” from react bootstrap – which is a sliding sidebar component. Notice we’re passing two props (showCart and setShowCart) – which we’re adding as a global state.
Let’s go back to App.jsx and export the signals and include the component we just created:
//import cart
const Cart = lazy(() => import("./Cart"));

//add signal
export const [showCart,setShowCart] = createSignal(false);

//add the component
<Cart />
Now, to show and hide the cart, we should be able to do it from any component in the application. Obviously – we’ll have an “add to cart” in the products section, but we’re not there yet.
For now, let’s add it to Header.jsx – so we can have a static “Cart” link for easy access.
//import our setter
import { setShowCart } from '../App';

//add as a handler to the click
<Nav.Link onClick={setShowCart(true)}>Cart</Nav.Link>
Now when you click on the “Cart” link in the header, you should see our Cart component slide in and out
Okay time to stop for now. I think we’ve made good progress. If you want to capture the code at this point of the tutorial, I’ve created a tag named part-1.
Stay tuned for Part 2.

2 Comments