VueJS is a JavaScript framework that is said to be “progressive”, easy to learn and a pleasure to write. I’ve heard plenty of developers rave about it, while the rest of the JS community are certainly intrigued by its simplicity, performance and concepts. One thing is for sure – the documentation is the best I’ve seen. So I’ve decided to give it a try, and write a tutorial about it. The app is loosely based on something I’m building for work actually.
What we’re building
Our application is a list of items is required for our users to read. This list can be filtered by category, and there will be a button for each item that when clicked, a modal will popup for our users. This modal will contain the reading material (in an iframe) along with a button for our users to click upon completing.
We will be using components to structure our app. One for the sidebar, the results area, and the modal. Here is a high-level wire frame of how our page will look:
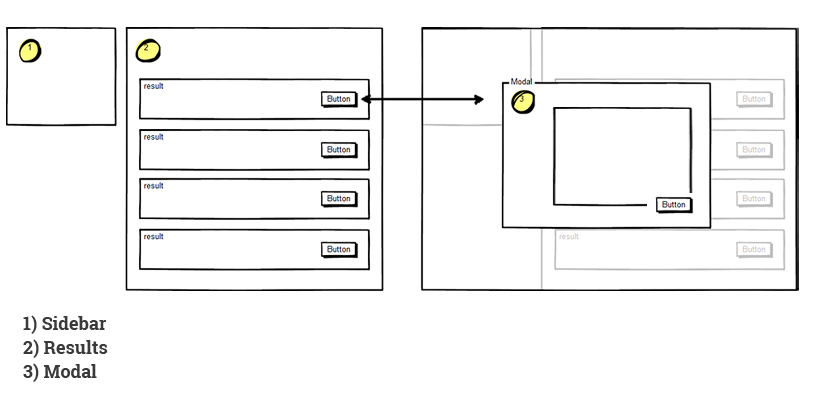
We have the categories in our sidebar. When a category is clicked, the results area should only show the filtered items. When an item is clicked, our modal component will appear.
The purpose of this tutorial is to show how to write a data-centric application. This means that all changes are done in data, then let Vue render what is needed in the DOM.
It is not a very detailed tutorial – but more of a high level one. Highlighting the functions and processes of VueJS.
Ready to get started? Let’s begin:
Setup the Root
We’re going to design our application to have all the data in the Root component. This will be the single source of truth for our items and categories. To start, we will have something like below:
var app = new Vue({
  el: '#app',
  data : {
      results : [],
      categories : []
  }
})
The above creates a new Vue instance, along with an “element” (el) and a data object. The “results” and “categories” array will be filled with the data we gather, this will populate our two components that we have yet to build.
One thing to note, our data.txt file represents the response from the server. Each record will look something like below:
{
  "id": 23,
  "Category": "accumsan odio",
  "DateCompleted": "",
  "Description": "ut odio cras mi pede malesuada in imperdiet et commodo vulputate justo",
  "External": false,
  "Title": "augue vestibulum rutrum rutrum neque aenean",
  "URL": "data/lorem.pdf"
}, ...
So we craft our data according to the structure above. This means compiling categories plus other string manipulations will have to be built manually.
Now let’s grab our data through ajax, so we can parse and stuff the results in our root component.
created : function(){
  var vm = this;
  $.get('data/data.txt')
     .done(function(d){
      var results = JSON.parse(d);
      vm.results = results;
 });
We’re using jQuery’s .get for ajax, and we’re running it inside our instance’s “created” method. The “created” method is a hook that runs after our instance has processed many of it’s necessary objects.
Our code above is good for our results, but we need categories as well. So we need to loop through each of the items, get the categories and remove the duplicates. We also want to build a unique identifier for these categories, so let’s add a “makeHash()” method for each of them before we stuff it inside our results:
Let’s use jQuery’s .each() and create a new property for each result called “categoryHash”, which will hold the value from our makeHash() method:
$.get('data/data.txt')
     .done(function(d){
      var results = JSON.parse(d);
      $.each(results,function(i,item){
         item.categoryHash = '';
         item.categoryHash = vm.makeHash(item.Category);
      })
      vm.results = results;
 });
Now let’s create a “method” object, which will hold our methods for our instance:
methods : {
    makeHash : function(str){
        return str.replace(/\s+/g, '-').toLowerCase();
    }
}
Now, from this data we can create a new method to build our categories. This will go in our methods object as well:
buildCategories : function(){
        var cats = [];
        var vm = this;
        for(var i=0; i<this.results.length; i++){
            cats.push(this.results[i].Category)
        }
        var uniqueCats = [];
        $.each(cats, function(i, el){
            if($.inArray(el, uniqueCats) === -1) uniqueCats.push(el);
        });
        var final = [];
        $.each(uniqueCats,function(i,el){
            var finalObj = {};
            finalObj['categoryName'] = el;
            finalObj['categoryHash'] = vm.makeHash(el);
            final.push(finalObj);
        })
        vm.categories = final;
  }
If all goes well, we should have something like below. Note that you need to install Vue developer tools to see this.

Let’s move on to build our templates. Remember, VueJS uses ordinary HTML to write templates – which is really cool. Let’s continue below:
The Sidebar Component
I like the concept of reusable components. Obviously, this is not the case for the sidebar – because there will always be one. So we’re not reusing this component at all!
But we’re building it as a component mainly for isolation purposes. I like seeing it on it’s own, and working on it’s own. Also I would like to see our main application div looking like below:
<div id="app">
    <Modal>...</Modal>
    <Sidebar>...</Sidebar>
    <Results>...</Results>
</div>
So you don’t have to build the sidebar as a component – is all I’m saying.
Creating a component in VueJS is as easy as pie:
Vue.component('Sidebar',{
    template : '#sidebar-template'
})
We pass 2 arguments: the name of the component, and a settings object. In the code above, we are passing a “template” setting, with the value of “#sidebar-template”. This translates to an HTML element with the id of “sidebar-template”. Let’s build that now. Inside our HTML:
<template id="sidebar-template">
    <div class="sidebar-wrap col-lg-3 col-md-3">
      <h3>Categories</h3>
        <a href="#" class="category-sidebar" v-for="category in categories">
            {{category.categoryName}}
        </a>
    </div>
</template>
One thing to note from the above is the “v-for” directive. This is what loops through our categories property (which is not there yet). Also notice the mustache-like templating syntax – which will output our “category” object’s “categoryName” property.
Next step – let’s assign the “categories” props. We do this in our component using the “props” as an array of possible props:
Vue.component('Sidebar',{
    template : '#sidebar-template',
    props : ['categories']
})
Lastly, we need to get the categories from Root, into our sidebar component. This is simple:
<div id="app">
    <Modal>...</Modal>
    <Sidebar v-bind:categories="categories">...</Sidebar>
    <Results>...</Results>
</div>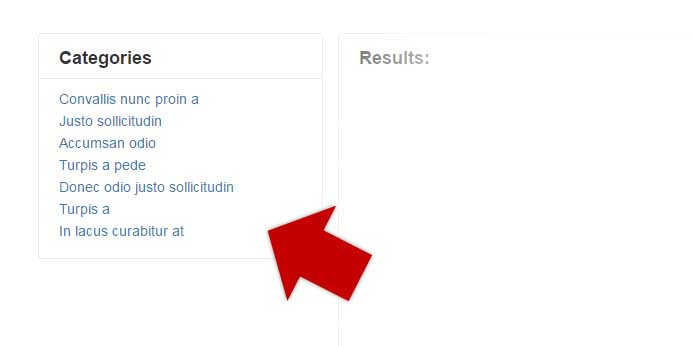
Pretty cool right? Of course the screenshot above has some styles applied to it and all. And of course, when clicked nothing happens yet. Let’s build the next component and take care of that.
The Results Component
So in this area, we’re going to list our result items. We’re also going to group them by categories, with category headings. These headings will have the same action – as clicking the sidebar items. Lastly, we’re going to have a button for each item, that when clicked – will launch a modal box.
Let’s get started by creating our component in Vue.
Vue.component('Results',{
    template : '#results-template',
    props: ['results','categories']
})
Notice that I’ve already went ahead and added 2 props: “results” and “categories”. Which we’re passing from our Root – and we already know how to do that. We’re mainly going to focus on the template.
Let’s look at the guts of it:
<template id="results-template">
    <div class="results-wrap col-lg-8 col-md-8">
        <h3>Results:</h3>
        <!--INSERT DATA HERE-->
    </div>
</template>
Now we’re going to do 2 loops, one for the categories, then the items. This will bring us the grouped structure that we need. Let’s add those “v-for” inside our new template:
<template id="results-template">
    <div class="results-wrap col-lg-8 col-md-8">
        <h3>Results:</h3>
        <div v-for="category in categories">
            <div class="category-name">
              {{category.categoryName}}
            </div>
            <div class="result" v-for="result in results">
            {{result.Title}}
            ...
            </div>
    </div>
</template>
So for every category, it will output the “categoryName”, and inside it – we output each result. But won’t this output EVERY result for each category? Yes it will! I’m glad that you’re still paying attention. What we need is a v-if directive in our result tile:
<div class="result"
     v-for="result in results"
     v-if="(category.categoryHash == result.categoryHash)
 >
    {{result.Title}}
    ...
</div>
Remember the “categoryHash” we created before? Well we’re using it here now for string comparison. This will only show the right items under each category. I also like to put each directive in a new line – so it’s easy to read.
Let’s create the method that filters the items in the categories:
filterCats : function(event){
        var vm = this;
        var hash = event.target.getAttribute("data-hash");
        var filtered = [];
        this.getItems().done(function(){ //puts results back to original
            $.each(vm.results,function(i,item){
                if(item.categoryHash == hash){
                    filtered.push(item);
                }
            })
            vm.results = filtered;
     })
 },
I’ve added this inside our Root’s methods object. This is because we’re sharing this method for both components. You will also notice a this.getItems() method. This is simply our original .get() ajax call that
I’ve added as well into the methods object. We simply call this method by adding this to our category name in our results:
<div class="category-name"
      v-on:click.prevent="$parent.filterCats($event)"
      v-bind:data-hash="category.categoryHash"
      >{{category.categoryName}}</div>
The v-on directive attaches an event handler to our div. So on “click” it calls our “filterCats()” method that we just created. We’ve also binded the “categoryHash” as an attribute – so we can fetch it in our event handler by doing this:
var hash = event.target.getAttribute("data-hash");I know, I know – now that I’m looking at it – I could’ve done this as well:
v-on:click.prevent="$parent.filterCats(category.categoryHash)"But whatever, Moving on.
We can also attach the same handler to our sidebar items. So both category elements in the page is handled by the same method.
Now, how about a button?
<button class="btn btn-sm btn-info btn-launch"
      v-show="!result.DateCompleted"
      v-on:click.prevent="$parent.launch($event)"
      v-bind:data-id="result.id">Launch</button>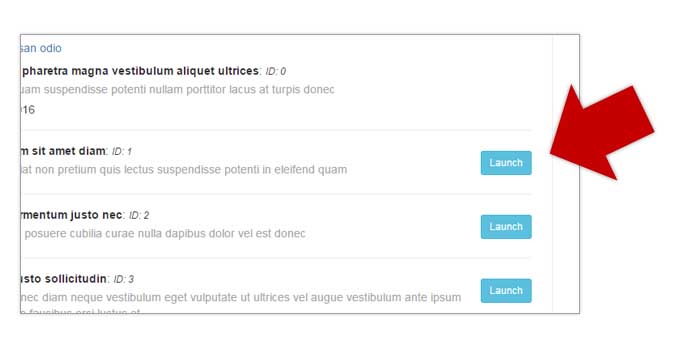
As you can see, we’re binding on “click”, to a method called “launch()” in the parent (which we haven’t created yet). We’re also binding the “data-id” attribute to the ID of the result.
The Modal Component
It turns out, that we will need additional data items in our Root’s data object. So for our modal box, we need to set it to true or false. We also need another one for the “current” item. This is what will be the content of our modal box.
data : {
      results : [],
      categories : [],
      modal : false,
      item : {}
  },
Let’s build that “launch()” method that is called by our button.
launch : function(event){
        var id = event.target.getAttribute("data-id");
        var currentItem = {}
        $.each(this.results,function(i,item){
            if(item.id == id){
                currentItem = item;
            }
        })
        this.item = currentItem;
        this.modal = true;
      }
So the above is pretty simple logic. When it is called, grab the data-id attribute of the button and look for it in our results array. If a match is found – put it in the “currentItem” object, and set the “modal” to true.
Now all we have to do is! You guessed it!
A “v-if” and “v-bind” to these two elements in our modal:
<template id="doc-modal-template">
<div v-show="modal" class="modal" id="doc-modal-window" style="display:block;">
<div class="modal-dialog">
<div class="modal-content">
<div class="modal-header">
<button type="button"
class="close"
data-dismiss="modal"
aria-label="Close"
v-on:click="$parent.modal=false">
<span aria-hidden="true">×</span>
</button>
<h4 class="modal-title">{{item.Title}}</h4>
</div>
<div class="modal-body">
<iframe allowfullscreen
v-bind:src="item.URL">
</iframe>
</div>
<div class="modal-footer">
<button class="btn btn-success">Complete</button>
</div>
</div><!-- /.modal-content -->
</div><!-- /.modal-dialog -->
</div><!-- /.modal -->
</template>You also see the small “x” Bootstrap button to close the modal. This simply sets the Root’s modal property to false.
Oh, and to create the component, create the props:
Vue.component('Modal',{
    template : '#doc-modal-template',
    props : ['modal','item']
})
Of course, pass it from Root:
<div id="app" class="container">
    <Modal v-bind:modal="modal" v-bind:item="item"></Modal>
    <Sidebar v-bind:categories="categories"></Sidebar>
    <Results v-bind:results="results" v-bind:categories="categories"></Results>
</div>
Here is what we have so far: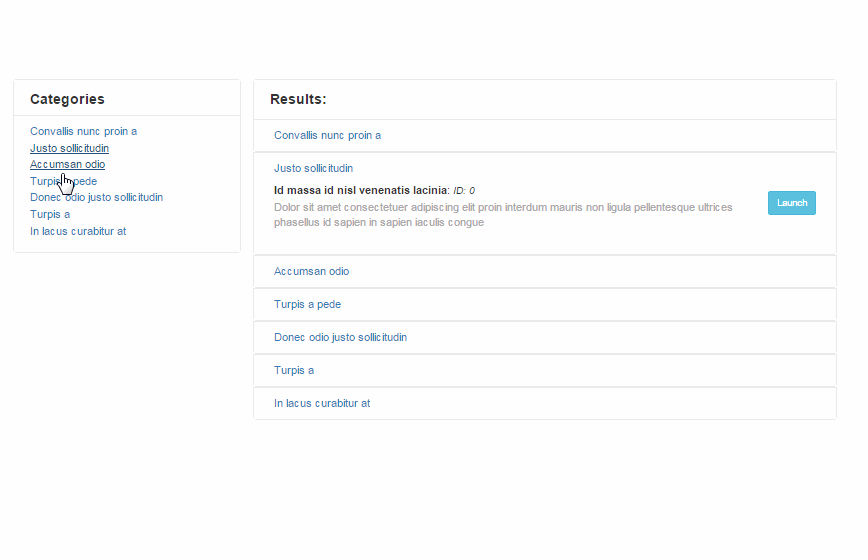
We also have a button that’s called “Complete”. The idea is that this will do another $.ajax() call to update the backend that the user completed reading the material. But since this is only a demo – I’m not going to go and provide that in here.
I’m sure that you get the gist of it.
Conclusion
So there you have it. We have a pretty good start at a real-world VueJS application. And it didn’t take much.
So my verdict? Yes – VueJS is a pleasure to write. The documentation will get you started in no time. It has concepts that reminded me of other frameworks, but the syntax and consistency are spot on. I can say it’s quite easy to get to this point – but I’m sure to many of us who’ve been coding “DOM-centric” style, there will be challenges in the long run.
Plus, there is the question of availability of plugins, like jQuery. But who knows – VueJS is on to a very good start. Maybe in a couple of years, it will have a big collection of ready made components to grab.
We just have to wait and see.